MICS edge micsNOte

Thank you for choosing Antelope Audio!

The activation of an Antelope microphone is needed to validate your product warranty and to unlock the microphone emulations software.
Internet connection is required for successful product activation.

The microphone emulations can be used in 2 different ways:

  1. 1. Inside the control panel of your Antelope interface
    This will present the following benefits to your workflow:
  • Onboard processing – you will be able to use the microphone emulations during real-time monitoring with zero CPU load.
  • Discrete preamp architecture – designed to complement the characteristics of the Edge microphones for better sonic quality during recording
  1. 2. Inside your DAW as a native plug-in (iLok 2/3 dongle required)
    This will present the following benefits to your workflow:

    • You don’t need to use or have an Antelope interface to run the plug-in.
    • You can choose and change the type of emulation after you have recorded the dry signal.

Step 1: Create an Antelope Audio User Account

Login/Create an Antelope Audio User Account

To activate your device, you will need to have an Antelope account.
To create an account, please click here.
Existing users can log in here.

login area

Step 2: Edge Microphone Activation

Once you have logged in, click on My Account in the top right   to access the user Dashboard

my account

Click on the Activate New Device button on the main Dashboard.

activ step

Choose your Edge microphone model from the device list:

select mic

After selecting your device, enter the 13-digit serial number which you can find on a small sticker in the base of your microphone:

edge solo

Next, download and install the Antelope Launcher. This is needed to pair the microphone emulations with an Antelope Audio interface and download them as native effects. The following screen will appear.

connect

Step 3 (Antelope Audio Interface Owners Only): Pair the Microphone Emulations

  • Download the Antelope Launcher for macOS or Windows, if you don’t have it yet.
  • Open the Antelope Launcher and Log in with the credentials you used to login into the Antelope Audio My Account

Important: Switch off your monitor speakers and any other peripherals from your interface as a safety precaution before you continue.

The microphone emulations can be paired with a single audio interface at a time. If you are an owner of multiple Antelope Audio devices, select the one you want to pair the emulations with and click on Manage Device:

Picture1

Navigate to “Feature Management” and in the +ADD section, put a checkmark next to Edge Microphone Emulations, then click Assign:

Picture2

Select Confirm in the next window.
The pairing is finished! Now, you can apply mic emulations in real-time with near zero latency from the Control Panel of your interface.

Step 4: Native Microphone Emulations plug-in. Redeem the Activation code.

NOTE:
*Edge Solo, Quadro & Verge native plug-ins are currently not compatible with macOS Monterey and Ventura.
*Edge Note native plug-ins are available in VST3 and AU formats.

In order to use the Native plug-in emulations in your DAW you need an iLok  hardware dongle (gen. 2 or later).

  • Visit www.ilok.com and download and install the iLok Licence Manager
  • Insert the hardware dongle into a USB port on your computer and launch the iLok License Manager Software.
  • Click Sign In or the small symbol shown below, and enter your account credentials – if you do not have an account, you will be required to create one from ilok.com.
i Lok

Click Licences > Redeem Activation Code in the top left corner.

redeem 1
  • You will be required to enter the iLok code for the native microphone emulations pack.
  • Find it in the My Software section of your user account.
  • Navigate to the emulations pack and click Download DAW effect
DAW effect

Copy the code, and paste in the iLok application.

i Lok2 1

Step 5: Installing the Native plug-in on Your Computer

  • Open the Antelope Launcher and go to the Plug-Ins tab.
  • Navigate to your Edge microphone.
  • Make sure you have selected the latest available Bundle version and click Install:
Picture3

Follow the on-screen installation steps, finally choose a location for each plug-in format and press Done:

Picture4

Step 6: Activate your product warranty

Lastly, you will be required to activate your product warranty. This is done from the My Warranty tab in My Antelope Account.

10mx get started 1

If you have successfully activated your product, it should now appear under My Warranty. Click on Add Warranty.

2

On the following screen you will be asked to enter information about your new device and to attach your warranty. You can add multiple files (up to five) by using the plus sign. Acceptable formats are .pdf, .jpg, .png, .jpeg, .heif, and the size limit is 7 MB per file. Once you have completed the steps click Add Warranty.

3

After successfully completing the process, you can click on View Warranty to see if your file has been uploaded correctly.

Download the Edge Mics user manual

System Requirements

Mac:

• Minimum: Mac OS X 10.12 Sierra. Recommended: Mac OS X 11.02 Big Sur
• Available storage space (Minimum 4 GB)
• Memory (RAM): 4 GB minimum (8 GB or more recommended)
*NOTE: Currently, the emulations of all our microphone models are not compatible with macOs Monterey.

Windows:

• Windows 10 (64-bit) with latest Microsoft Updates
• Available storage space (Minimum 4 GB)
• Memory (RAM): 4 GB minimum (8 GB or more recommended)
• CPU: Intel Core i3™ or AMD FX (Higher recommended)

Additional Information:

• iLok (gen 2 or later) USB hardware dongle is required to for native use of the emulations
• Stable Internet connection is required to download and update your Antelope Audio Software

Learn how to record with your Edge modeling microphone and apply the emulations during mixing:

Need any help?

Visit the Antelope Audio Customer Support page, choose your device and find the required information.

感谢您选择羚羊音频产品!

快速指南将指导您激活Edge系列建模话筒,并下载安装所有相关软件,从而获得产品质保以及话筒仿真模拟功能。要激活您的设备,请务必按照以下说明进行操作。请注意,成功激活产品需要您的电脑连接到互联网。

在开始之前,需要提醒您的是: Edge系列话筒最适合与采用离散式话放的羚羊音频接口一同使用。 这将为您在工作中带来以下优势:

1. 内置处理引擎 – 能够在零CPU负载的情况下,将话筒仿真模拟用于无延迟的直接监听。

2. 离散式话放架构 – 为适配Edge建模话筒的特性而设计,从而在录音时获得更好的音质。

请注意,要使用Native版本的话筒仿真插件,无论您是否使用羚羊音频接口,都需要使用iLok USB加密狗(第2代或更高版本)以及iLok License Manager软件来管理授权。有了iLok加密狗,您可以将话筒仿真授权随身携带,并在任何地方使用它们。

下载EDGE MICS 使用手册

第1步:登录/注册羚羊音频账号

打开浏览器,在地址栏中输入https://antelopeaudio.com/login/。使用您的电子邮件和密码登录您的羚羊音帐号。如果您还没有自己的羚羊音频账号,请访问https://antelopeaudio.com/sign-up/ 并注册一个新账号。

login area

第2步:激活Edge话筒

登录后,点击右上角的“My Account”打开用户页面。

my account

点击“Activate New Device”按钮。

activ step

从设备列表中选择你的Edge话筒的具体型号。该系列中的所有建模话筒都在“Modeling Mics”分类中,而旧版Edge话筒在“Legacy Devices”分类中。

select mic

选择设备后,输入话筒的13位序列号,您可以在话筒底部的标签上找到该序列号。

edge solo

确认设备激活后,请根据您的操作系统(Windows / Mac)下载并安装Antelope Launcher。此时屏幕上将显示以下内容。

connect

第3步:将话筒仿真功能分配到音频接口(仅针对羚羊音频接口用户)

安装Launcher应用程序后,将其打开并点击“Login”按钮。输入您的电子邮箱和密码,然后单击“Login”登录您的羚羊音频账号。

重要提示: 安全起见,在开始分配话筒仿真功能之前,请关闭连接到音频接口的监听音箱和其他外围设备。

话筒仿真功能在同一时间只能分配到一台音频接口。如果您拥有多台羚羊音频接口,请选择要分配的设备,然后在该设备右侧的区域点击“Manage Device”。

ossc

在羚羊注册向导窗口中,选择“Activate device or assign features”,然后点击“Continue”。

ehe

在接下来的页面中,选中“ Edge Microphone Emulations”,然后点击“ Continue”。

assign

该操作会将话筒仿真功能分配到音频接口,使您可以在音频接口的控制面板中以几乎零延迟的方式使用话筒仿真模拟。 点击“Done”,分配完成。

第4步:将话筒仿真Native插件授权到iLok

如果您没有羚羊音频接口,或是希望将话筒仿真功能作为Native插件在DAW中直接使用,都将需要iLok加密狗(第2代或更高版本)。 为此,请访问www.ilok.com并下载安装iLok Licence Manager软件。 将iLok插入电脑的USB端口,然后启动iLok License Manager软件。单击“Sign In”或下图红圈中的按钮,然后输入您的登录信息。如果您没有iLok帐号,则需要在www.ilok.com注册一个新账号。

i Lok

登陆后,单击左上角的Licences > Redeem Activation Code。

redeem 1

您需要在这里输入话筒仿真Native插件的iLok码。您可以在www.antelopeaudio.com用户页面的“My Software”中找到它。找到emulations pack,然后点击“Download DAW effect”。

DAW effect

复制代码,然后粘贴到iLok应用程序中。

i Lok2 1

第5步:在您的电脑中安装话筒仿真Native插件

打开Antelope Launcher,然后进入“Plug-ins”页面。找到您的Edge话筒,并在后方的方框中将其选中,然后点击左下角的“Update”。 随后将开始安装最新版本的话筒仿真Native插件。

launcher

您可以选择是否安装32位插件,并选择安装位置。如需要安装请点击点击“Done”。若不需要安装32位插件,请点击“Skip”。

Get started 5.2

第6步:激活您的产品保修

最后,您需要激活您的产品保修。请在羚羊官网的My Antelope Account – My Warranty页面中完成激活。

10mx get started 1

如果您已成功激活您的产品,此刻它应该出现在My Warranty页面中。点击右侧的Add Warranty按钮即可添加保修信息。

2

在接下来的页面中,您需要添加有关新设备的信息。包括Date of Purchase – 购买日期和Proof of Purchase – 购买凭证,您可以使用加号添加多个文件(最多5个文件), 可接受的格式有 .pdf、.jpg、.png、.jpeg、.heif,每个文件的大小限制为 7 MB。 完成这些步骤后,点击Add Warranty即可完成保修激活。

3

成功完成上述步骤后,您可以点击View Warranty来查看您的文件是否已正确上传。

下载EDGE MICS 使用手册

系统要求:

Mac:

• 最低:Mac OS X 10.12 Sierra. 推荐:Mac OS X 11.02 Big Sur
• 充足的存储空间:最小4 GB
• 内存:最小4 GB (推荐8 GB或以上)

Windows:

• 最新版本的Windows 10 (64-bit)
• 充足的存储空间:最小4 GB
• 内存:最小4 GB (推荐8 GB或以上)
• CPU:最低Intel Core i3™ 或AMD FX

额外需求:

• 使用话筒仿真Native插件,需要iLok USB加密狗(第2代或更高版本) 。
• 下载和更新羚羊音频软件需要稳定的Internet连接。

Learn how to record with your Edge modeling microphone and apply the emulations during mixing:

需要帮助?

请访问羚羊音频客户支持页面,选择您的设备并找到所需的信息。

您也可指扫描下方二维码,添加我们的微信技术支持。

weechat qr

Thank you for choosing Antelope Audio!

Edge マイクのアクティベーションは、製品使用のために必ず行う必要があるプロセスです。アクティベーションは、製品保証の確認やマイクのエミュレーションにアクセスするために必要となります。製品のアクティベーションを行うには以下の手順に従ってください。 なお、製品のアクティベーションにはインターネット接続が必要です。

先に進む前に、Edge シリーズのマイクフォンはディスクリートプリアンプを搭載した Antelope Audio のインターフェイスとの組み合わせに最適であることにご留意ください。これにより、お客様のワークフローに以下のようなメリットがあります。

1. オンボードプロセッシング – CPU 負荷をかけずに、リアルタイムモニタリング時にマイクエミュレーションを使用することができます。

2. ディスクリートプリアンプアーキテクチャ – Edge マイクロフォンの特性を補完するように設計されており、レコーディング時の音質を向上させます。

Antelope Audio インターフェースの有無にかかわらず、エミュレーションをネイティブに使用するためのコードを利用するには、別売りの iLok (gen 2 もしくはそれ以降) USB ハードウェアドングルと、認証を管理するための iLok License Manager ソフトウェアが必要となります。iLok USB ハードウェアドングルがあれば、マイクエミュレーションライセンスを物理的なドライブに入れて、どこにでも持ち運ぶことができます。

EDGE MICS のユーザーマニュアルをダウンロード

ステップ1: ログイン / Antelope Audio ユーザーアカウントの作成

インターネットブラウザを開き https://antelopeaudio.com/login/ にアクセスします電子メールとパスワードを使って、Antelope Audio のユーザーアカウントにログインしてください。アカウントをお持ちでない方はhttps://antelopeaudio.com/sign-up/ にアクセスしてアカウントを作成してください。その後、受け取ったEメールで登録の認証を行ってください。 

login area

ステップ2:Edge マイクロフォンのアクティべーション

ログイン後、右上の「My Account」をクリックすると https://antelopeaudio.com/ のユーザーダッシュボードにアクセスできます。

my account

Activate New Device ボタンをクリックします。

activ step

デバイスリストから Edge マイクのモデルを選択してください。現在の製品ラインのすべてのモデリングマイクは「Modeling Mics」のセクションにあり、オリジナルのもの、そして現在はレガシーとなっているEdgeマイクは「Legacy Devices」のセクションにあります。

select mic

デバイスを選択した後、マイクの底面に貼られている小さなシールに記載されている13桁のシリアルナンバーを入力します。

edge solo

デバイスの起動を確認した後は、Antelope Launcher をダウンロードしてインストールします。これは、マイクエミュレーションを Antelope Audio インターフェースとペアリングし、ネイティブエフェクトとしてダウンロードするために必要です。以下の画面が表示されます。

connect

ステップ3(Antelope Audio インターフェイスをお持ちの方のみ):マイクエミュレーションのペアリング

macOS または Windows 用の「Antelope Launcher」をダウンロードします。Launcher アプリケーションをインストールしたら、それを開き「Login」ボタンをクリックします。Antelope Audio の「My Account」エリアにログインする際に使用した電子メールとパスワードを入力し、「Login」をクリックします。

重要:マイクエミュレーションをペアリングするプロセスを開始する前に、安全のためにモニタースピーカーやその他周辺機器をインターフェイス取り外してください。

マイクエミュレーションは、一度に1つのオーディオインターフェースとペアリングできます。複数の Antelope Audio デバイスを所有している場合は、エミュレーションをペアリングしたいデバイスを選択し、「Manage Device」をクリックしてください。

ossc

Antelope Registration Wizard のウィンドウで「Activate device or assign features」を選択し、「Continue」をクリックします。

ehe

次のウィンドウで「Edge Microphone Emulations」の横にチェックマークを付け、「Continue」をクリックします。

assign

これにより、マイクエミュレーションとオーディオインターフェイスがペアリングされ、インターフェイスのコントロールパネルからほぼゼロレイテンシーでリアルタイムに適用できるようになります。「Done」をクリックするとペアリングが完了します。

ステップ4 - Native Microphone Emulations 用コードの利用

マイクエミュレーションを DAW のネイティブエフェクトとして使用したい場合、また、Antelope Audio インターフェースをお持ちでない方には、iLok (gen 2 もしくはそれ以降) ハードウェアドングルが必要となります。これを行うには www.ilok.com にアクセスし、iLok ライセンスマネージャーソフトウェアをダウンロードしてインストールしてください。ハードウェアドングルをコンピュータの USB ポートに挿入し、iLok ライセンスマネージャソフトウェアを起動します。「Sign In」、または下記の小さなシンボルをクリックしてアカウント情報を入力してください。アカウントをお持ちでない場合は、 www.ilok.com からアカウントを作成する必要がございます。

i Lok

左上の「Licences」→「Redeem Activation Code」をクリックします。

redeem 1

ネイティブマイクエミュレーションパックの iLok コードを入力する必要があります。iLok コードは、 www.antelopeaudio.com ユーザーアカウントのダッシュボードの「My Software」セクションで見つけることができます。エミュレーションパックに移動し、「Download DAW effect」をクリックします。

DAW effect

コードをコピーして、iLok アプリケーションに貼り付けてください。

i Lok2 1

ステップ5:Native Mic Emulations のコンピュータへのインストール

Antelope Launcher を起動し、「Plug-Ins」タブに移動します。Edge マイクを選択し、空欄にチェックマークを入れて、左下の「Update」を押します。これによりマイクに付属しているソフトウェアの最新バージョンがインストールされます。

launcher

次の画面では 32-bit のプラグインをインストールするオプションがあります。ご希望のフォーマットを選択し、インストール先を選択して「Done」を押してください。

Get started 5.2

Step 6: 製品保証のアクティベート

最後に製品保証をアクティベートする必要があります。これは My Antelope AccountMy Warranty タブから行います。

10mx get started 1

製品のアクティベーションが完了していれば My Warranty に製品が表示されます。Add Warranty をクリックします。

2

次の画面では新しいデバイスに関する情報の入力と、保証書の添付が求められます。プラス記号を使って複数のファイル(最大5つ)を追加することができます。使用可能なフォーマットは、.pdf、.jpg、.png、.jpeg、.heifで、1つのファイルのサイズ制限は 7MB です。ステップが完了したら Add Warranty をクリックしてください。

3

プロセスが正常に完了した後 View Warranty をクリックすると、ファイルが正しくアップロードされたかどうかを確認することができます。

EDGE MICS のユーザーマニュアルをダウンロード

動作環境:

Mac:

• 最低動作環境: Mac OS X 10.12 Sierra 推奨動作環境: Mac OS X 11.02 Big Sur
• 最小 4 GB の空き容量
• メモリ (RAM): 最低 4 GB (8 GB もしくはそれ以上推奨)

Windows:

• Windows 10 (64-bit)、 最新の Microsoft Updates
• 最小 4 GB の空き容量
• メモリ (RAM): 最低 4 GB (8 GB もしくはそれ以上推奨)
• CPU: Intel Core i3™ もしくは AMD FX (それ以上推奨)

追加情報:

• エミュレーションをネイティブに使用するには、iLok (gen 2 もしくはそれ以上) USB ハードウェアドングルが必要です。
• Antelope Audio Software のダウンロードとアップデートには、安定したインターネット接続が必要です。

Learn how to record with your Edge modeling microphone and apply the emulations during mixing:

お困りの場合は

Antelope Audio のカスタマーサポートページにアクセスし、お使いのデバイスを選択して必要な情報を見つけてください。

Merci d’avoir choisi Antelope Audio!

L’activation d’un microphone Edge est un processus obligatoire qui doit être complété une fois que vous recevez votre produit. Il est nécessaire pour valider la garantie de votre produit et pour accéder aux émulations de microphone. Pour activer votre produit, assurez-vous de suivre les instructions répertoriées. Gardez à l’esprit qu’une connexion Internet est nécessaire pour une activation réussie du produit.

Avant de continuer, veuillez noter que la gamme de microphones Edge est la mieux adaptée pour fonctionner avec une interface Antelope Audio avec des préamplis discrets. Cela présentera les avantages suivants pour votre flux de travail:

1. Traitement intégré – vous pourrez utiliser les émulations de microphone pendant la surveillance en temps réel sans charge CPU.

2. Architecture de préampli discret – conçue pour compléter les caractéristiques des microphones Edge pour une meilleure qualité sonore pendant l’enregistrement.

Bear in mind that redeeming the code for native use of the emulations – with and without Antelope Audio interface – requires an iLok (gen 2 or later) USB hardware dongle sold separately and the iLok License Manager software to manage the authorization. Having an iLok USB hardware dongle allows you to carry your microphone emulation licenses on a physical drive wherever you may be using them.

TÉLÉCHARGEZ LE MANUEL D'UTILISATION EDGE MICS

Étape 1: Connectez-vous / Créez un compte utilisateur Antelope Audio

Ouvrez votre navigateur Internet et accédez à https://antelopeaudio.com/login/. Connectez-vous à votre compte utilisateur Antelope Audio avec votre e-mail et votre mot de passe. Si vous n’avez pas de compte, visitez https://antelopeaudio.com/sign-up/ pour en créer un – n’oubliez pas de confirmer votre inscription via l’e-mail que vous avez reçu.

login area

Étape 2: Edge Activation du Microphone

Une fois connecté, cliquez sur Mon compte en haut à droite pour accéder au tableau de bord utilisateur sur https://antelopeaudio.com/

my account

Cliquez sur le bouton Activate New Device.

activ step

Choisissez votre modèle de microphone Edge dans la liste des appareils. Tous les microphones à modélisation de la gamme de produits actuelle se trouvent dans la section Modélisation des microphones et le microphone Edge d’origine, désormais hérité, se trouve dans la section Legacy Devices.

select mic

Après avoir sélectionné votre appareil, entrez le numéro de série à 13 chiffres que vous pouvez trouver sur un petit autocollant à la base de votre microphone.

edge solo

Après avoir confirmé l’activation de l’appareil, il est temps de télécharger et d’installer Antelope Launcher. Ceci est nécessaire pour coupler les émulations de microphone avec une interface Antelope Audio et les télécharger en tant qu’effets natifs. L’écran suivant va apparaitre.

connect

Étape 3 (propriétaires de l'interface audio Antelope uniquement): associez les émulations de microphone

Téléchargez Antelope Launcher pour macOS ou Windows. Après avoir installé l’application Launcher, ouvrez-la et cliquez sur le bouton Login. Entrez l’e-mail et le mot de passe que vous avez utilisés pour vous connecter à la zone My Account d’Antelope Audio et cliquez sur Login.

Important: avant de commencer les processus de couplage des émulations de microphone, éteignez les haut-parleurs de votre moniteur et tous les autres périphériques de votre interface par mesure de sécurité.

Les émulations de microphone peuvent être associées à une seule interface audio à la fois. Si vous êtes propriétaire de plusieurs appareils Antelope Audio, sélectionnez celui avec lequel vous souhaitez associer les émulations et cliquez sur Manage Device.

ossc

Dans la fenêtre de l’assistant d’enregistrement des antilopes, choisissez Activate device or assign features et cliquez sur Continue.

ehe

Dans la fenêtre suivante, cochez la case Edge Microphone Emulations et cliquez sur Continue.

assign

Cela associera les émulations de microphone à l’interface audio, ce qui vous permettra de les appliquer en temps réel avec une latence proche de zéro depuis le panneau de configuration de votre interface. Cliquez sur Done et le couplage est terminé.

Étape 4 – Utilisez le code pour les émulations de microphone natives

Si vous souhaitez utiliser les émulations de microphone comme effets natifs dans votre DAW et pour tous les utilisateurs sans interface Antelope Audio, vous aurez besoin d’un dongle matériel iLok (gen. 2 ou supérieur). Pour ce faire, visitez www.ilok.com et téléchargez et installez le logiciel iLok License Manager. Insérez le dongle matériel dans un port USB de votre ordinateur et lancez le logiciel iLok License Manager. Cliquez sur Se connecter ou sur le petit symbole ci-dessous, puis entrez les informations d’identification de votre compte – si vous n’avez pas de compte, vous devrez en créer un à partir de www.ilok.com.

i Lok

Cliquez sur Licences > Redeem Activation Code.

redeem 1

Vous devrez entrer le code iLok pour le pack d’émulations de microphone natif. Vous pouvez le trouver dans la section Mes logiciels du tableau de bord de votre compte utilisateur www.antelopeaudio.com. Accédez au pack d’émulations et cliquez sur Download DAW effect.

DAW effect

Copiez le code et collez-le dans l’application iLok.

i Lok2 1

Étape 5: Installation des émulations de micro natives sur votre ordinateur

Démarrez Antelope Launcher et accédez à l’onglet Plug-Ins. Sélectionnez votre microphone Edge, cochez le champ vide et appuyez sur Mettre à jour dans le coin inférieur gauche. Cela installera la dernière version du logiciel fourni avec votre microphone.

launcher

Dans l’écran suivant, vous avez la possibilité d’installer les plugins 32 bits. Sélectionnez le format souhaité, choisissez un emplacement et appuyez sur Done.

Get started 5.2

Etape 6: Activer votre garantie de produit

Enfin, vous devrez activer votre garantie de produit. Cela s’effectue depuis l’onglet My Warranty dans My Antelope Account.

10mx get started 1

Si vous avez déjà activé votre produit, il devrait maintenant apparaître dans My Warranty. Cliquez sur Add Warranty.

2

Sur l’écran suivant on vous demandera de rentrer les informations à propos de votre nouveau matériel et d’y attacher votre garantie. Vous pouvez ajouter plusieurs fichiers (jusqu’à cinq) en utilisant le signe +. Les formats acceptés sont .pdf, .jpg, .png, .jpeg, .heif, et la limite de taille est de 7 MB par fichier. Après avoir suivi ces étapes cliquez sur Add Warranty.

3

Lorsque la procédure est complète vous pouvez cliquer sur View Warranty pour vérifier si votre fichier a été téléchargé correctement.

TÉLÉCHARGEZ LE MANUEL D'UTILISATION EDGE MICS

Configuration requise:

Mac:

  • • Minimum: Mac OS X 10.12 Sierra. conseillé: Mac OS X 11.02 Big Sur
  • • Espace de stockage disponible (Minimum 4 GB)
  • • Mémoire (RAM): 4 GB minimum (8 GB or more conseillé)

Windows:

  • • Windows 10 (64-bit) avec les dernières mises à jour Microsoft
  • • Espace de stockage disponible (Minimum 4 GB)
  • • Mémoire (RAM): 4 GB minimum (8 GB ou plus conseillé)
  • • CPU: Intel Core i3™ or AMD FX (ou plus conseillé)

Information additionnelle:

  • • Le dongle matériel USB iLok (gen 2 ou ultérieur) est requis pour une utilisation native des émulations
  • • Une connexion Internet stable est requise pour télécharger et mettre à jour votre logiciel audio Antelope

Learn how to record with your Edge modeling microphone and apply the emulations during mixing:

Besoin d’aide?

Visitezla page d’assistance à la clientèle d’Antelope Audio, choisissez votre appareil et recherchez les informations requises.

Vielen Dank, dass Sie sich für Antelope Audio entschieden haben!

Die Aktivierung des Edge Mikrofons ist ein notwendiger Vorgang, der vorgenommen werden muss, sobald Sie Ihr Mikrofon erhalten haben. Sie ist nötig, um die Produktgarantie zu bestätigen und um Zugang zu den Mikrofon-Emulationen zu erhalten. Um das Produkt zu aktivieren, führen Sie bitte die folgend aufgelisteten Schritten durch. Für die erfolgreiche Produktaktivierung ist eine Internetverbindung erforderlich.

Bevor Sie fortfahren, beachten Sie bitte, dass Edge Mikrofone am besten für die Arbeit mit einem Antelope Audio Interface mit dessen diskreten Vorverstärkern geeignet sind. Folgende Vorteile ergeben sich für den eigenen Workflow:

1. Onboard Verarbeitung – Die Mikrofon-Emulationen lassen sich in Echtzeit-Monitoring nutzen, ohne die CPU zu belasten.

2. Diskrete Preamp Architektur – Entwickelt, um die Charakteristik der Edge Mikrofone abzurunden und für eine bessere Klangqualität während der Aufnahme zu sorgen.

Bitte beachten Sie, dass der einzulösende Code für den nativen Gebrauch der Emulationen – mit oder ohne Antelope Audio Interface – einen iLok USB Dongle (2. Generation oder höher) erfordert, der separat verkauft wird, sowie die iLok Licence Manager Software, um die Autorisierung durchzuführen. Der iLok USB Dongle ermöglicht es Ihnen, die Lizenzen für die Emulationen in physischer Form jederzeit dabei zu haben, egal wo Sie sie benötigen.

LADEN SIE DAS EDGE MICS BENUTZERHANDBUCH HERUNTER

Schritt 1: Login/Registrierung eines Antelope Audio Benutzerkonto

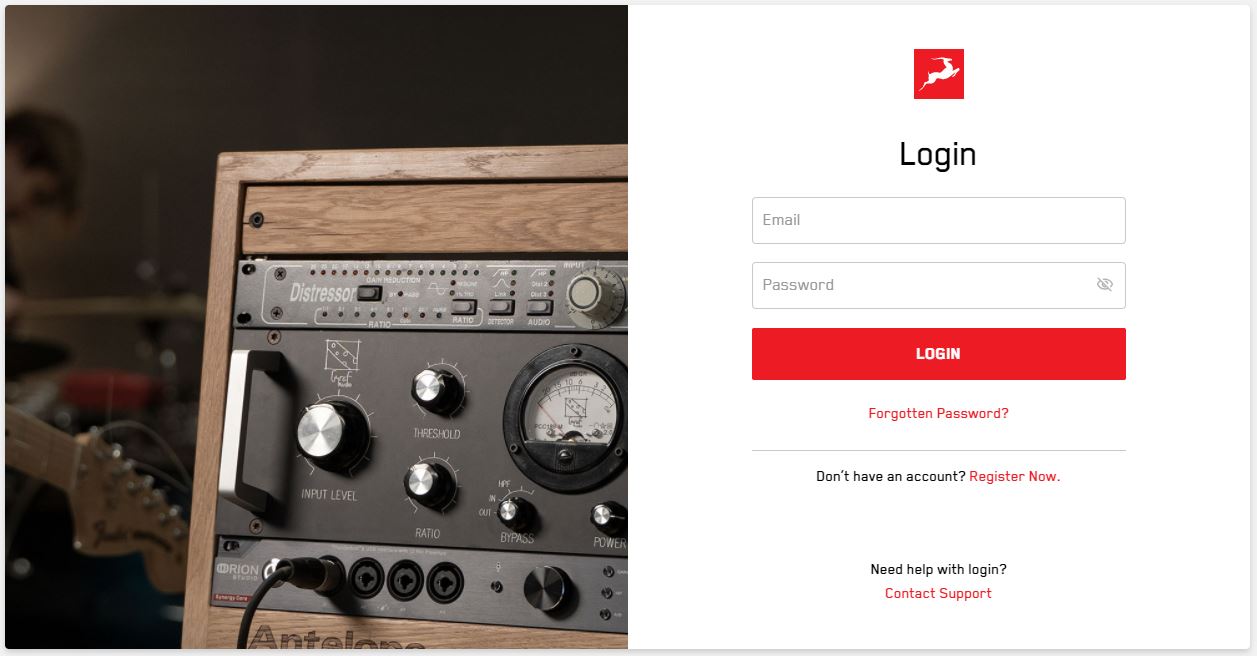
Öffnen Sie Ihren Internetbrowser und rufen Sie die Seite https://antelopeaudio.com/login/ auf. Loggen Sie sich mit Ihrer E-Mail-Adresse und Ihrem Passwort in Ihr Antelope Audio Benutzerkonto ein. Wenn Sie noch kein Account haben, besuchen Sie bitte https://antelopeaudio.com/sign-up/, um ein Konto zu erstellen. Vergessen Sie nicht, Ihre Registrierung per E-Mail zu bestätigen.

login area

Schritt 2: Aktivierung des Edge Mikrofons

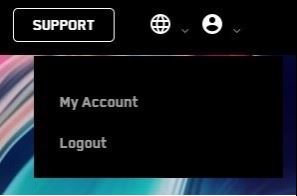
Nachdem Sie sich eingeloggt haben, klicken Sie auf „My Account“ oben rechts, um das User-Dashboard auf https://antelopeaudio.com/ aufzurufen.

my account

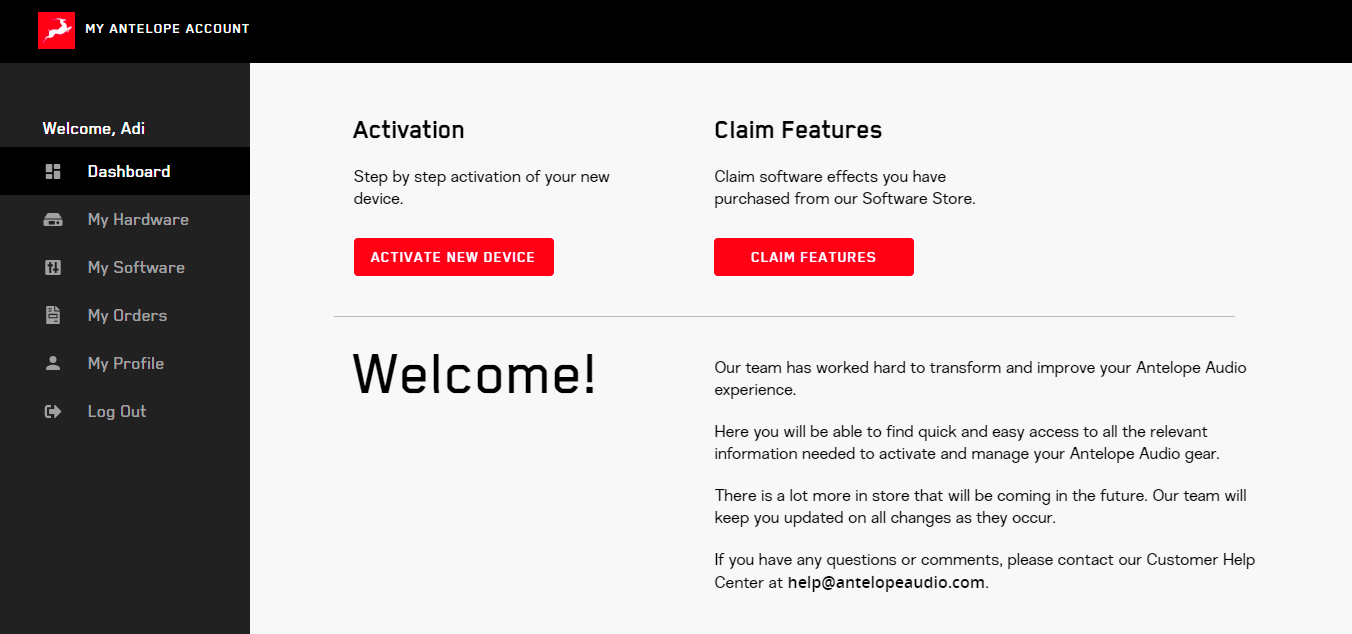
Klicken Sie auf den Activate Device Button.

activ step

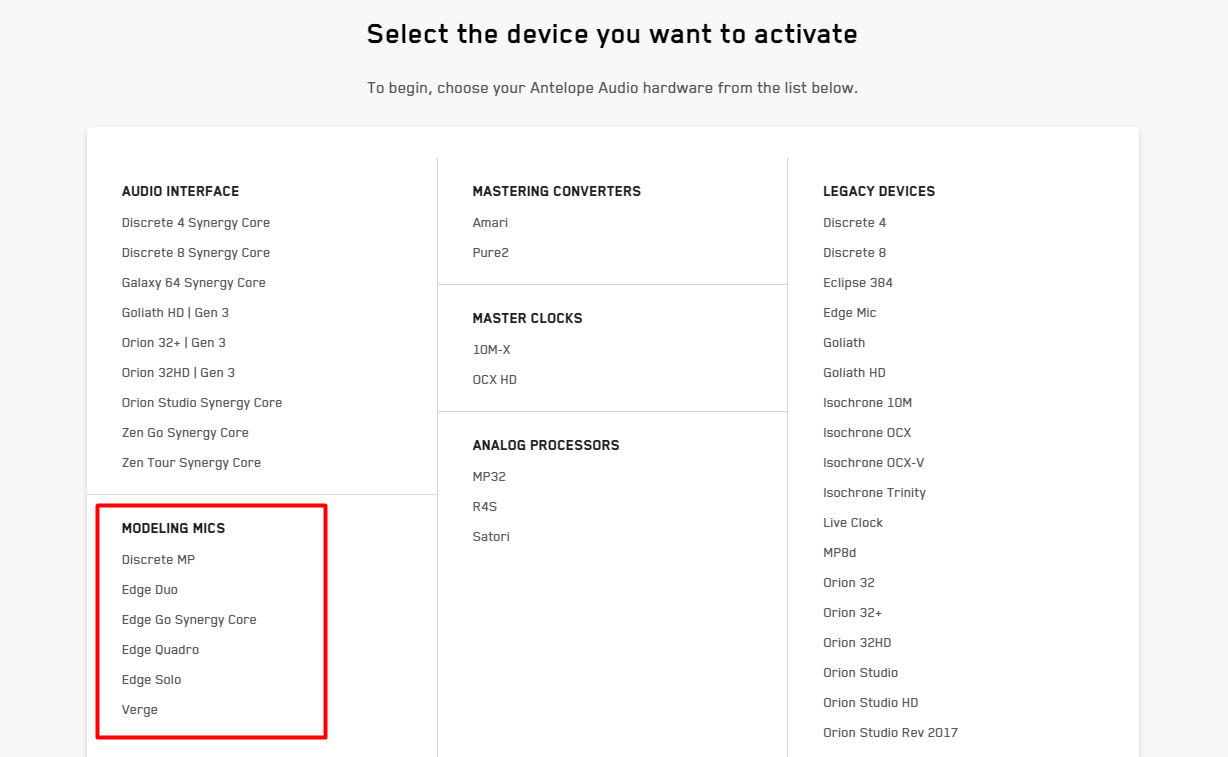
Wählen Sie Ihr Edge Mikrofon aus der Geräteliste. Alle Modeling-Mikrofone der aktuellen Produktlinie sind in der Kategorie Modeling Mics zu finden, das originale und heutige Legacy Edge Mikrofon ist bei Legacy Devices zu finden.

select mic

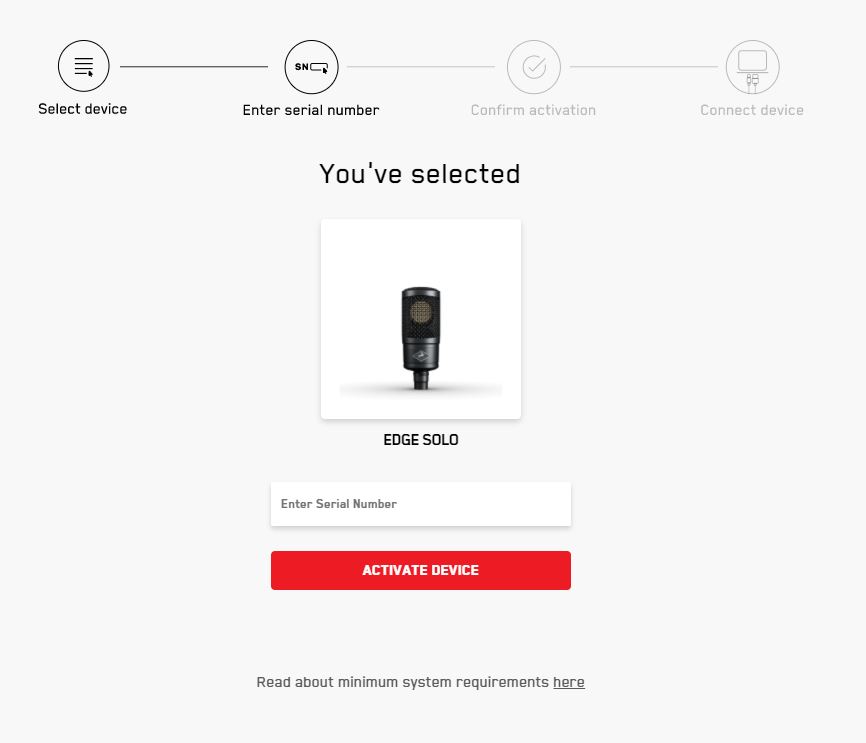
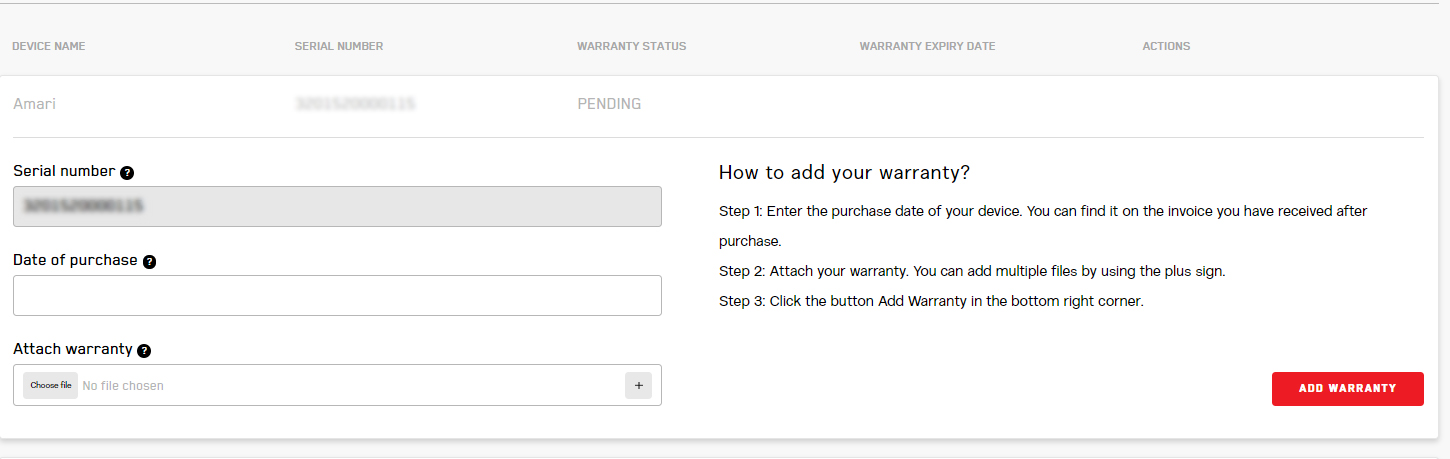
Nachdem Sie Ihr Gerät ausgewählt haben, tragen Sie die 13-stellige Seriennummer ein, die Sie auf dem kleinen Aufkleber auf der Unterseite des Mikrofons finden.

edge solo

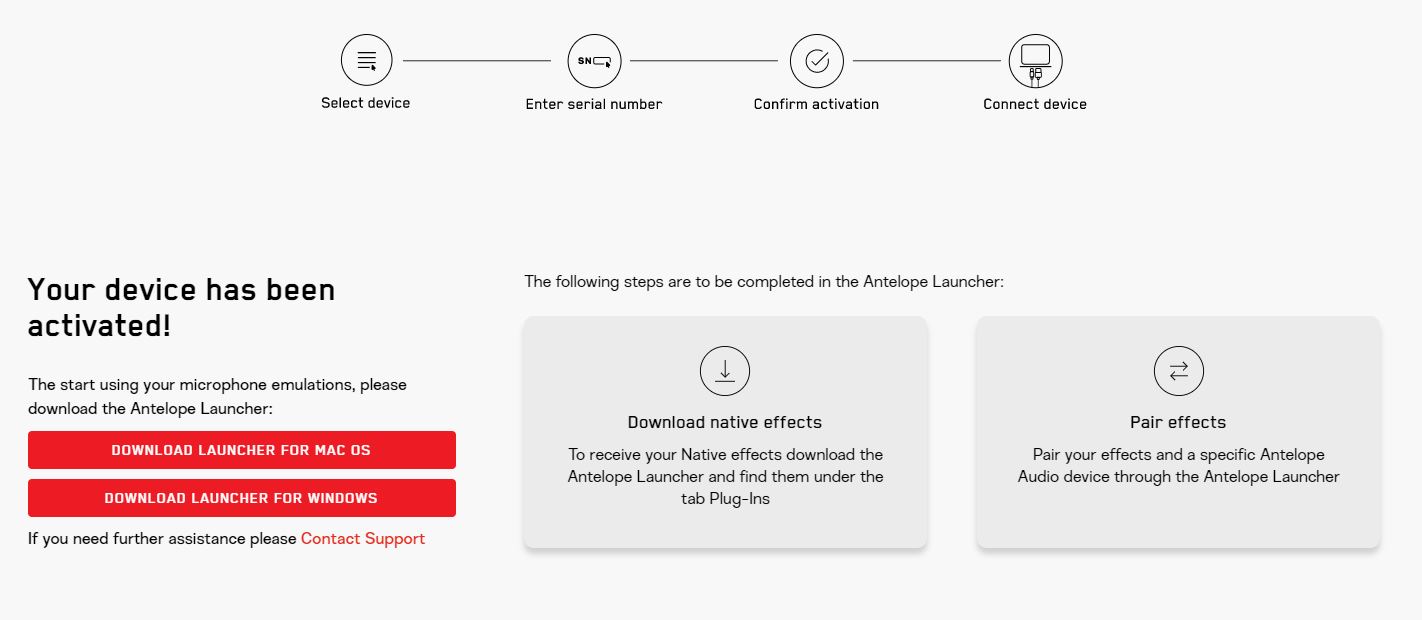
Bestätigen Sie die Aktivierung des Geräts und laden Sie anschließend den Antelope Launcher herunter und installieren Sie ihn. Das ist nötig, um die Mikrofon-Emulationen dem Antelope Audio Interface zuzuweisen und sie als native Effekte herunterzuladen. Der folgende Bildschirm wird angezeigt:

connect

Schritt 3 (nur wenn Sie ein Antelope Audio Interface besitzen): Zuweisen der Mikrofon-Emulationen

Laden Sie den Antelope Launcher für macOS oder Windows herunter. Nachdem Sie das Programm installiert haben, öffnen Sie es und klicken Sie auf Login. Tragen Sie die E-Mail-Adresse und das Passwort ein, die Sie für das Einloggen unter My Account für Ihr Antelope Audio Benutzerkonto verwendet haben, und klicken Sie auf Login.

Wichtig: Schalten Sie Ihre Monitorboxen sowie andere Peripheriegeräte an Ihrem Interface zur Sicherheit aus, bevor Sie mit dem Kopplungsprozess mit den Mikrofon-Emulationen beginnen.

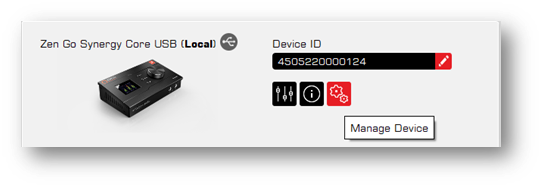
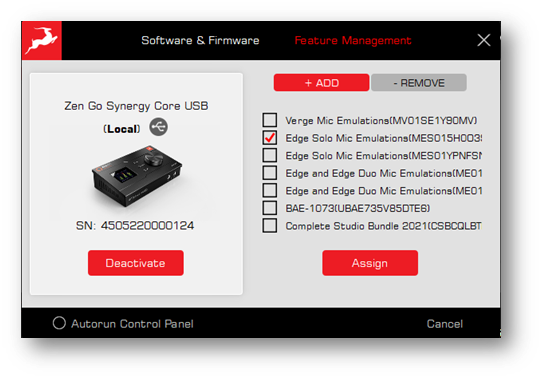
Die Mikrofon-Emulationen können nur einem einzigen Interface gleichzeitig zugewiesen werden. Wenn Sie mehrere Antelope Audio Geräte besitzen, wählen Sie das Gerät aus, dem Sie die Emulationen zuweisen wollen und klicken Sie auf Manage Devices.

ossc

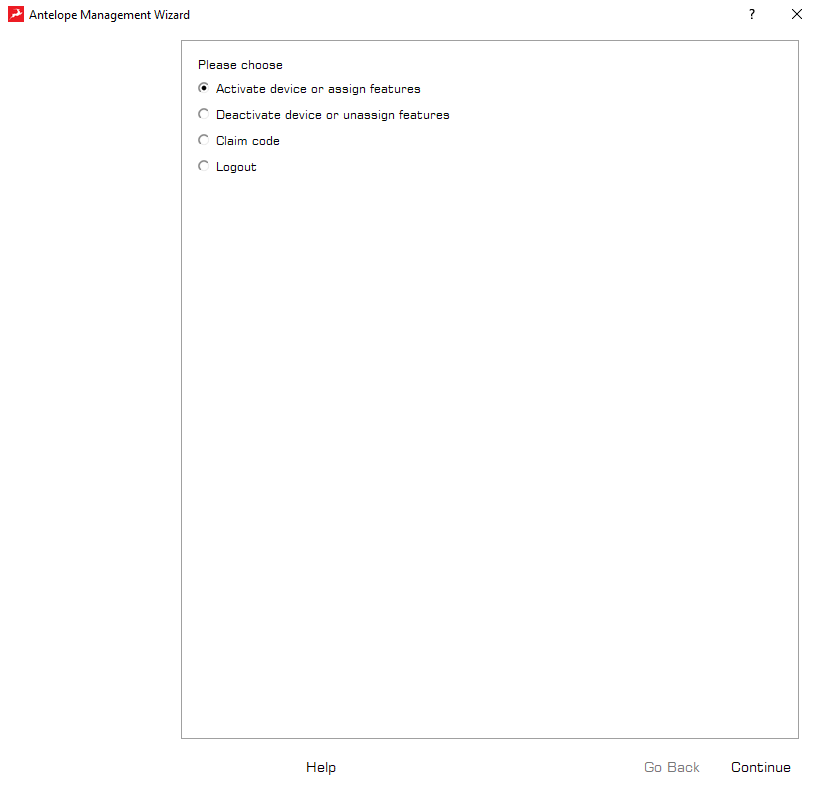
Im Fenster des Antelope Registration Wizards, wählen Sie Activate device or assign features und klicken Sie anschließend auf Continue.

ehe

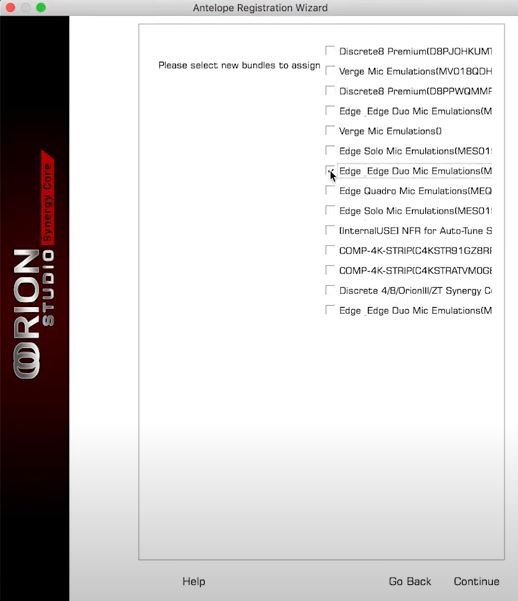
Setzen Sie den Auswahlpunkt neben Edge Microphone Emulations und klicken Sie auf Continue.

assign

Dies wird die Mikrofon-Emulationen Ihrem Audiointerface zuweisen und ermöglichen, dass sie über den Control Panel des Interfaces in Echtzeit und ohne Latenz eingesetzt werden.

Schritt 4: Lösen Sie den Code für die nativen Mikrofon-Emulationen ein

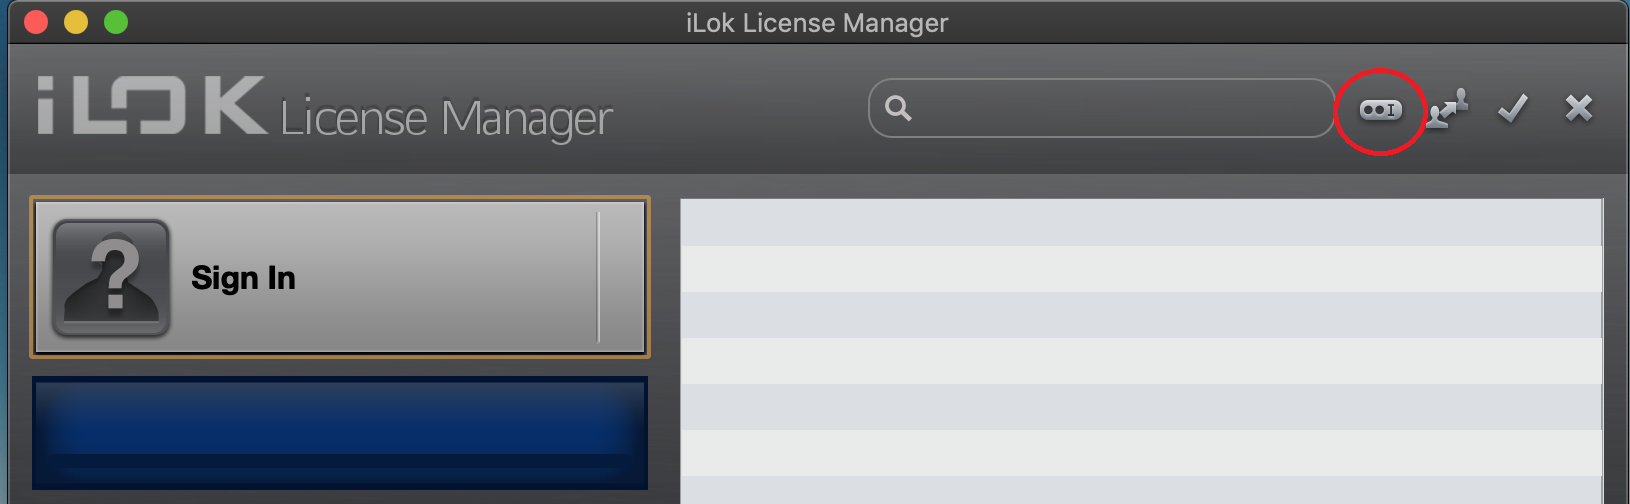
Wenn Sie die Mikrofon-Emulationen als native Effekte in Ihrer DAW nutzen wollen oder kein Antelope Audio Interface besitzen, ist die Benutzung eines iLok Dongles der 2. Generation oder höher notwendig. Besuchen Sie die Website www.ilok.com und laden Sie die iLok Licence Manager Software herunter und installieren Sie sie. Stecken Sie den iLok Dongle in einen USB-Port Ihres Computers und starten Sie die iLok Licence Manager Software. Klicken Sie auf „Sign In“ oder auf das kleine Symbol, wie auf dem folgenden Bild angezeigt, und geben Sie Ihre Zugangsdaten ein. Wenn Sie noch kein Benutzerkonto haben, müssen Sie es zunächst unter www.ilok.com erstellen.

i Lok

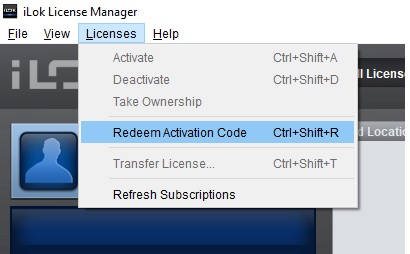
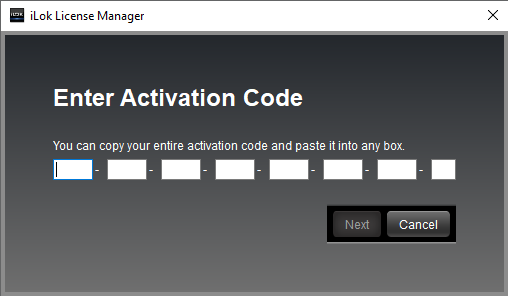
Klicken Sie danach auf Licences > Redeem Activation Code in der oberen linken Ecke.

redeem 1

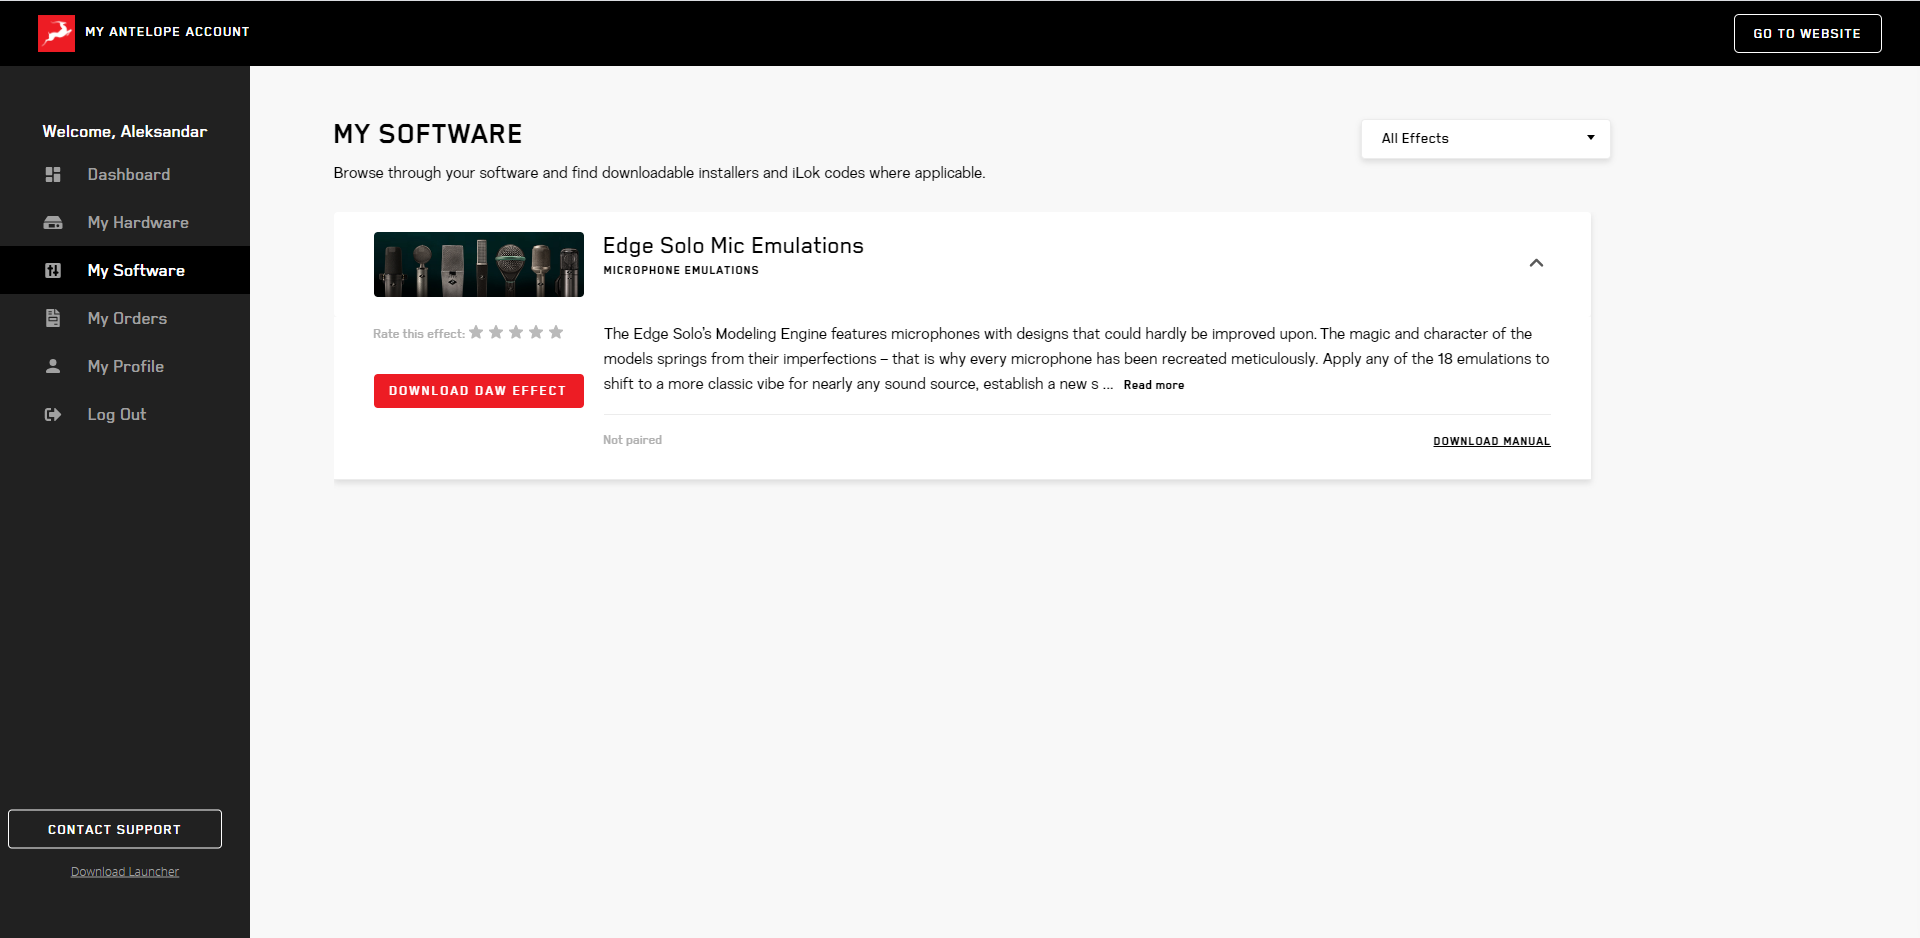
Hier müssen Sie dann den iLok Code für das native Emulationspaket eingeben. Sie finden diesen im Bereich My Software auf dem Dashboard Ihres Benutzerkontos auf www.antelopeaudio.com . Navigieren Sie zum Emulationspaket und klicken Sie auf Download DAW effect.

DAW effect

Kopieren Sie den Code und fügen Sie ihn in der iLok Software ein.

i Lok2 1

Schritt 5: Installieren der nativen Mikrofon-Emulationen auf dem Computer

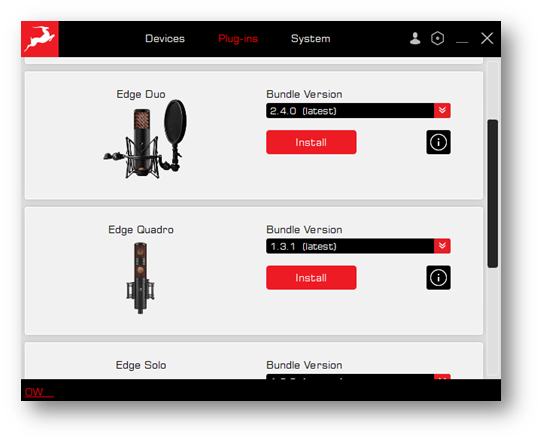
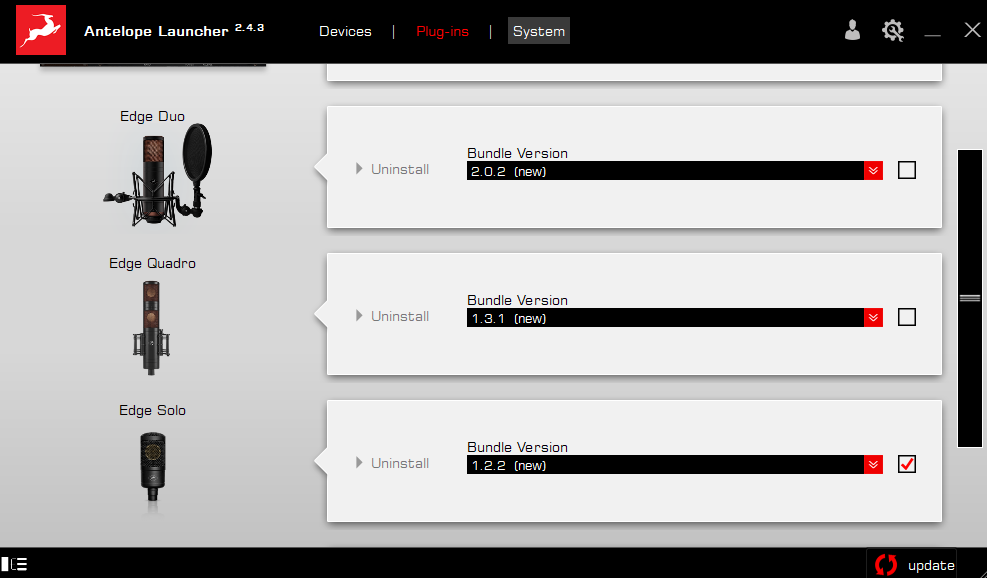
Starten Sie den Antelope Launcher und klicken Sie auf den Plug-Ins Tab. Wählen Sie Ihr Edge Mikrofon aus, setzen Sie ein Häkchen in dem leeren Kästchen und klicken Sie anschließend auf Update in der unteren linken Ecke. Dies wird die neueste Version der Software für Ihr Mikrofon installieren.

launcher

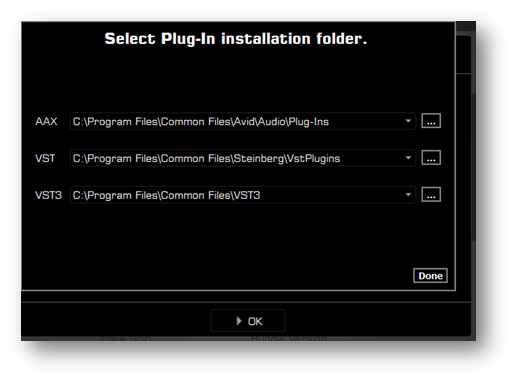
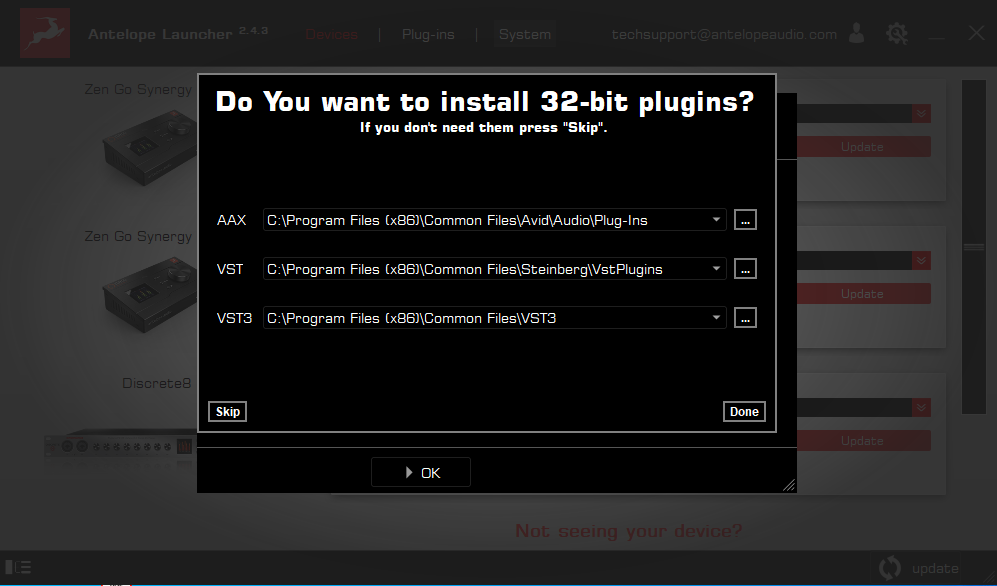
Auf dem danach folgenden Bildschirm haben Sie die Option, die 32-bit Plugins zu installieren. Wählen Sie Ihr bevorzugtes Format sowie den Speicherort und klicken Sie anschließend auf Done.

Get started 5.2

Schritt 6: Aktivierung der Produktgarantie

Schließlich müssen Sie Ihre Produktgarantie aktivieren. Dies erfolgt über My Warranty in My Antelope Account.

10mx get started 1

Wenn Sie Ihr Produkt erfolgreich aktiviert haben, sollte es jetzt unter My Warranty erscheinen. Klicken Sie auf Add Warranty.

2

Auf dem folgenden Bildschirm werden Sie aufgefordert, Informationen zu Ihrem neuen Gerät einzugeben und Ihre Garantie beizufügen. Sie können mehrere Dateien (bis zu fünf) mit dem Pluszeichen hinzufügen. Akzeptable Formate sind: PDF, .jpg, .png, .jpeg, .gif, und die Größenbeschränkung beträgt 7 MB pro Datei. Sobald Sie die Schritte abgeschlossen haben, klicken Sie auf Add Warranty.

3

Nach einem erfolgreichen Abschluss des Vorgangs klicken Sie auf View Warranty, um sicher zu gehen, dass Ihre Datei korrekt hochgeladen wurde.

LADEN SIE DAS EDGE MICS BENUTZERHANDBUCH HERUNTER

Systemvoraussetzungen:

Mac:

  • • Minimum: Mac OS X 10.12 Sierra. Recommended: Mac OS X 11.02 Big Sur
  • • Available storage space (Minimum 4 GB)
  • • Memory (RAM): 4 GB minimum (8 GB or more recommended)

Windows:

  • • Windows 10 (64-bit) with latest Microsoft Updates
  • • Available storage space (Minimum 4 GB)
  • • Memory (RAM): 4 GB minimum (8 GB or more recommended)
  • • CPU: Intel Core i3™ or AMD FX (Higher recommended)

Zusätzliche Informationen:

  • • iLok (gen 2 or later) USB hardware dongle is required to for native use of the emulations
  • • Stable Internet connection is required to download and update your Antelope Audio Software

Learn how to record with your Edge modeling microphone and apply the emulations during mixing:

Brauchen Sie Hilfe?

Besuchen ie die Seite des Antelope Audio Customer Support, wählen Sie Ihr Gerät und finden Sie dort alle Informationen, die Sie brauchen.

Grazie per aver scelto Antelope Audio!

L’attivazione di un microfono Edge è un processo che deve essere completato una volta ricevuto il prodotto. È necessario per convalidare la garanzia e per accedere alle emulazioni del microfono. Per attivare il tuo prodotto, assicurati di seguire le istruzioni elencate. Tieni presente che per l’attivazione è necessaria una connessione Internet.

Prima di continuare, tieni presente che la linea di microfoni Edge è progettata per funzionare al meglio con i pre amplificatori discreti delle interfacce Antelope Audio. In questo modo avrai i seguenti vantaggi:

1. Elaborazione integrata – sarai in grado di utilizzare le emulazioni del microfono durante il monitoraggio in tempo reale con zero carico della CPU.

2. Architettura del preamplificatore discreta – progettata per integrare le caratteristiche dei microfoni Edge per una migliore qualità sonora durante la registrazione.

Per ottenere il codice per l’utilizzo delle emulazioni, con e senza interfaccia Antelope Audio, è necessaria una chiave iLok (gen 2 o successive) venduta separatamente e il software iLok License Manager per gestire l’autorizzazione. Avere un dongle hardware USB iLok ti consente di trasportare le licenze di emulazione del microfono su un’unità fisica ovunque tu possa utilizzarle.

SCARICA IL MANUALE UTENTE DI EDGE MICS

Passaggio 1: Accedi / Crea un account utente Antelope Audio

Apri il tuo browser Internet e vai su https://antelopeaudio.com/login/. Accedi al tuo account utente di Antelope Audio con la tua e-mail e password. Se non hai un account, visita https://antelopeaudio.com/sign-up/ per crearne uno – non dimenticare di confermare la registrazione tramite l’e-mail che hai ricevuto.

login area

Passaggio 2: attivazione del microfono Edge

Una volta effettuato l’accesso, clicca su https://antelopeaudio.com/.

my account

Clicca sul bottone Activate New Device.

activ step

Scegli il modello del tuo microfono Edge dall’elenco dei dispositivi. Tutti i microfoni di modellazione dell’attuale linea di prodotti si trovano nella sezione Microfoni di modellazione e l’originale, e ora legacy, ovvero il microfono Edge si trova nella sezione Dispositivi legacy.

select mic

Dopo aver selezionato il tuo dispositivo, inserisci il numero di serie di 13 cifre che puoi trovare su un piccolo adesivo alla base del microfono.

edge solo

Dopo aver confermato l’attivazione del dispositivo, è il momento di scaricare e installare Antelope Launcher. Ciò è necessario per accoppiare le emulazioni del microfono con un’interfaccia Antelope Audio e scaricarli come effetti nativi. Apparirà la seguente schermata.

connect

Passaggio 3 (solo per possessori di interfaccia audio Antelope): accoppiare le emulazioni del microfono

Scarica Antelope Launcher per macOS o Windows. Dopo aver installato l’applicazione Launcher, aprila e fai clic sul pulsante Login. Inserisci l’e-mail e la password che hai utilizzato per accedere all’area My Account di Antelope Audio e fai clic su Login.

Importante: prima di avviare i processi di associazione delle emulazioni del microfono, spegnere gli altoparlanti del monitor e qualsiasi altra periferica dall’interfaccia come precauzione di sicurezza.

Le emulazioni del microfono possono essere accoppiate con una singola interfaccia audio alla volta. Se sei proprietario di più dispositivi Antelope Audio, seleziona quello con cui desideri accoppiare le emulazioni e fai clic su Manage Device.

ossc

Nella finestra della procedura guidata di registrazione di Antelope, scegli Activate device or assign features e fai clic su Continue.

ehe

In the subsequent window, place a checkmark next to Edge Microphone Emulations and click Continue.

assign

Questo accoppierà le emulazioni del microfono con l’interfaccia audio che ti permetterà di applicarle in tempo reale con latenza quasi zero dal pannello di controllo della tua interfaccia. Fai clic su Done e l’accoppiamento è terminato.

Passaggio 4: riscatta il codice per le emulazioni di microfono native

Se desideri utilizzare le emulazioni del microfono come effetti nativi nella tua DAW e per tutti gli utenti senza interfaccia Antelope Audio, avrai bisogno di un dongle hardware iLok (gen. 2 o successivo). A tale scopo, visita www.ilok.com scarica e installa il software iLok License Manager. Inserisci la chiavetta in una porta USB del computer e avvia il software iLok License Manager. Fai clic su Accedi o sul piccolo simbolo mostrato di seguito e inserisci le credenziali del tuo account: se non hai un account, ti verrà richiesto di crearne uno da www.ilok.com.

i Lok

Fai clic su Licences > Redeem Activation Code nell’angolo in alto a sinistra.

redeem 1

Ti verrà richiesto di inserire il codice iLok per il pacchetto di emulazioni di microfono nativo. Puoi trovarlo nella sezione Il mio software della dashboard del tuo account utente www.antelopeaudio.com. Passa al pacchetto di emulazioni e fai clic su Download DAW effect.

DAW effect

Copia il codice e incollalo nell’applicazione iLok.

i Lok2 1

Passaggio 5: installazione delle emulazioni di microfono native sul computer

Avvia Antelope Launcher e vai alla scheda Plug-in. Seleziona il tuo microfono Edge, metti un segno di spunta nel campo vuoto e premi Aggiorna nell’angolo in basso a sinistra. In questo modo verrà installata l’ultima versione del software fornito con il microfono.

launcher

Nella schermata seguente, hai la possibilità di installare i plugin a 32 bit. Seleziona il formato desiderato, scegli una posizione e premi Done.

Get started 5.2

Passaggio 6: Attiva la garanzia del tuo prodotto

Ti verrà richiesto di attivare la garanzia del prodotto. La procedura viene completata accedendo alla scheda My warranty ne My Antelope Account.

10mx get started 1

Se hai attivato con successo il tuo prodotto, ora dovrebbe apparire sotto My Warranty. Fai click su Add Warranty.

2

Nella schermata successiva ti verrà chiesto di inserire le informazioni sul tuo nuovo dispositivo e di allegare la tua garanzia. Puoi aggiungere più file (fino a cinque) utilizzando il segno più. I formati accettabili sono .pdf, .jpg, .png, .jpeg, .heif e il limite di dimensione è 7 MB per file. Una volta completati i passaggi, fai click su Add Warranty.

3

Dopo aver completato con successo il processo, puoi fare click su View Warranty per vedere se il tuo file è stato caricato correttamente.

SCARICA IL MANUALE UTENTE DI EDGE MICS

Requisiti di sistema:

Mac:

  • • Minimo: Mac OS X 10.12 Sierra. Raccomandato: Mac OS X 11.02 Big Sur
  • • Spazio di archiviazione disponibile (Minimo 4 GB)
  • • Memoria (RAM): 4 GB minimo (8 GB o piu’ raccomandati)

Windows:

  • • Windows 10 (64-bit) con ultimo aggiornamento Microsoft
  • • Spazio di archiviazione disponibile (minimo 4 GB)
  • • Memoria (RAM): 4 GB minimo (8 GB o piu’ raccomandati)
  • • CPU: Intel Core i3™ or AMD FX (Higher recommended)

Informazioni aggiuntive:

  • •iLok (gen 2 o successivo) per l’utilizzo nativo delle emulazioni è necessario un dongle hardware USB. È necessaria una connessione Internet stabile per scaricare e aggiornare il software Antelope Audio

Learn how to record with your Edge modeling microphone and apply the emulations during mixing:

Bisogno di qualche aiuto?

Visita la pagina dell’assistenza clienti di Antelope Audio, scegli il tuo dispositivo e trova le informazioni richieste.

Close Menu

© 2016 Antelope Audio. All Rights Reserved