
Thank you for choosing Antelope Audio!

This quick start guide will help you activate your new Zen Go Synergy Core interface and download all accompanying software. Completion of the process is needed to validate your product warranty and gain access to special software packages and exclusive product offers.

To activate your product, please make sure to follow the instructions listed. Bear in mind that an internet connection is required for successful product activation.

Watch the tutorial video below for an explanation of the entire activation process or follow the steps listed below.

Step 1: Getting Started

To see proper instructions select the connection of your device:

Getting Started with The Zen Go Synergy Core

Connect the audio interface to your Windows or Mac computer using the supplied USB cable.

Get started step1 new
  • Important:
    • Zen Go Synergy Core is a USB-C bus-powered interface and therefore it requires steady power from the computer ports. It is recommended to use ports such as USB 3, USB 3.1/USB-C that are located on the motherboard, which on PCs are usually placed on the back of the computer case. Using auxiliary ports, usually on the front of the PC, may result in audible interference on the output audio and performance issues due to insufficient power.
  •  • Even though USB 2 ports may still be used, some may not deliver enough power. The interface requires at least 700 mA of power – this means a standard USB 2.0 port with 500 mA is not sufficient. Aside from not being able to power the device at all, it can also result in humming from the outputs or performance-related issues. In such cases, it is advised to switch to a different port or use an externally powered USB hub. Please note, that the hub must use mains power instead of being bus-powered. You can use the Zen Go Synergy Core as a standalone device by using the additional USB-C port – used only for power supply.
Difference Between USB Ports

Connect the Zen Go Synergy Core to a Windows or macOS computer using a Thunderbolt™ 3 cable (not included).

Your device will not get recognized in the Antelope Launcher and DAW until you install the necessary macOS / Windows driver in Step 3

  • IMPORTANT:
    The Zen Go Synergy Core is bus-powered from your computer’s Thunderbolt™ port and no external power is necessary. Note that legacy Thunderbolt™ 2 and 1 connections via external adapters are incompatible due to insufficient power delivery. The Zen Go Synergy Core is compatible only with Thunderbolt™ 3. Read how to identify the ports on your Mac
Read How to Resolve Ground Loop Issues

Step 2: Log-in to your Antelope Audio User Account

Visit www.antelopeaudio.com and log-in. If you do not already have an account, you will be required to create one. Click here to proceed to the sign-up form and registration process.

login area

Step 3: Activate your Audio Interface

Once you have logged in, go to your account “Dashboard” and click Activate New Device.

activationnew

Select your device from the list and download the Antelope Launcher for Mac or Windows. Install the application using the on-screen instructions and start the Antelope Launcher.

snip

If you are on a macOS the next step is to install the Unified driver. Log in with your Antelope Audio account in the Antelope Launcher and go to the System menu. If you are an owner of an M1 Apple Silicon-powered computer follow the installation guide here.

Select the latest Bundle Version in the Antelope Unified Driver field. Place a checkmark in the empty box and click on update. If you are on Windows, the ASIO driver will be installed automatically as part of the device Bundle described in Step 4.

zqsc new 1

* If you are running OS 10.15 Catalina or higher, please go through this article to allow the driver installation in the Security and Privacy settings.

For Zen Go Thunderbolt on Windows only
The Windows Thunderbolt driver can be installed from the System tab of the Antelope Launcher. Select the latest version from the drop-down menu, put a checkmark in the empty box and click Update in the bottom right corner.

MicrosoftTeams image 2

* Please, make sure you have the Microsoft Thunderbolt™ Control Center installed – you can download the file from here:
https://apps.microsoft.com/store/detail/9N6F0JV38PH1

* Our Windows Thunderbolt Driver supports only ASIO operation in DAW applications and does not have a WDM (Windows Audio) mode yet. To enable Windows audio via Thunderbolt, a third-party software is required. We recommend Voicemeeter, which you can download from here:
https://vb-audio.com/Voicemeeter/

* The driver is not yet compatible with Thunderbolt™ 4 ports on Windows.

Log-in with your Antelope Audio account. Your interface should be listed in the Devices menu. Click on Activate Device and proceed with the on-screen instructions. The device will restart after successful activation.

qXvOlzRfFngXBYmzIIQAfiMVPHFHxOTeKA

Congratulations, your audio interface is now activated. Product activation is a one-time process and once completed, you will not be required to do it again.

Step 4: Software Update

After successful activation, it is time to complete the final step before you can use your interface – to update the Zen Go Synergy Core to the latest firmware, driver(Windows only) and Control Panel versions. To do this, open the Antelope Launcher, go to Bundle Version, and select the latest version from the list.

bundlever

Click Update and follow the on-screen instructions. The device will restart after a successful update. This will indicate that the interface is fully operational and loaded with the latest control panel, unified driver, and firmware versions.

Step 5: Activate your product warranty

Lastly, you will be required to activate your product warranty. This is done from the My Warranty tab in My Antelope Account.

1

If you have successfully activated your product, it should now appear under My Warranty. Click on Add Warranty.

2

On the following screen you will be asked to enter information about your new device and to attach your warranty. You can add multiple files (up to five) by using the plus sign. Acceptable formats are .pdf, .jpg, .png, .jpeg, .heif, and the size limit is 7 MB per file. Once you have completed the steps click Add Warranty.

3

After successfully completing the process, you can click on View Warranty to see if your file has been uploaded correctly.

Download the Zen Go Synergy Core user manual

You can now move on to learn how to use the Control Panel and set up your first session:

System Requirements

To see proper System Requirements select the connection of your device:

Mac:

  • • Apple Mac 2013 or newer
  • • Minimum: Mac OS 10.14 Mojave. Recommended: Mac OS 11.02 Big Sur
  • • Available storage space(Minimum 4 GB)
  • • Memory (RAM): 4 GB minimum (8 GB or more recommended)

Windows:

  • • PC computer with USB 2.0/3.0/3.1 port
  • • Windows 10 (64-bit) with latest Microsoft Updates
  • • Available storage space (Minimum 4 GB)
  • • Memory (RAM): 4 GB minimum (8 GB or more recommended)
  • • CPU: Intel Core i3™ or AMD FX (Higher recommended)

Additional Information:

  • • Stable Internet connection is required to download and update your Antelope Audio Software

Mac:

  • • Apple Mac 2016 or newer with a Thunderbolt™ 3 port
  • • Minimum: Mac OS X 10.14 Mojave. Recommended: Mac OS X 11.02 Big Sur
  • • Available storage space(Minimum 4 GB)
  • • Memory (RAM): 4 GB minimum (8 GB or more recommended)

Windows:

  • • PC computer with a Thunderbolt 3™ port
  • • Windows 10 (64-bit) with latest Microsoft Updates
  • • Available storage space (Minimum 4 GB)
  • • Memory (RAM): 4 GB minimum (8 GB or more recommended)
  • • CPU: Minimum Intel Core i3™ or AMD Ryzen (Higher recommended)

Additional Information:

  • • Stable Internet connection is required to download and update your Antelope Audio Software

Need any help?

Visit the Antelope Audio Customer Support page, choose your device and find the required information.

       FAQ:

How many DSP chips does the Zen Go Synergy Core
have?

The Zen Go Synergy Core has 1 DSP chip capable of loading effects on 4 individual
channel strips.

Does the Zen Go Synergy Core work with
Thunderbolt?

The Zen Go Synergy Core has a USB version and a Thunderbolt version.
Both are
compatible with Thunderbolt 3 ports, but the USB version will work as a USB device. The
Zen Go will not work on a Thunderbolt 2 port.

Do I need a power supply to use the Zen Go Synergy
Core?

No, the Zen Go Synergy Core is bus powered and you can connect it directly to your
computer without any additional power supply. If you have the USB version, you can use
it as a standalone device by using the additional USB-C port – used
only for power supply.

What clocking technology does the Zen Go Synergy Core
use?

The Zen Go Synergy Core uses the 64-bit Acoustically Focused Clocking™ technology
designed by Antelope Audio and used in most of our products.

WHAT IS THE DIFFERENCE BETWEEN ZEN GO THUNDERBOLT AND ZEN GO USB?

The Zen Go Thunderbolt and Zen Go USB versions have identical technical specifications and I/O. The main difference is the communication port. The Thunderbolt version provides better latency and more Computer playback/recording channels, while the USB version has wider compatibility since it uses a USB2.0 protocol.
The USB version has an additional power supply port while the Thunderbolt version has only a Thunderbolt 3 port.

Does the Zen Go Synergy Core have the same preamp
quality as the more expensive Antelope Audio interfaces?

The Zen Go Synergy Core uses Discrete ultra-linear console-grade preamps which are the
same used in higher class devices like Zen Tour and Orion Studio Synergy Core.

How many effects does the Zen Go Synergy Core
have?

It comes with 37 Synergy Core effects and you can expand this library from the Software
Store by adding the currently available Antelope Audio effects.

Can you send different signals to the RCA and Monitor
outs?

No, the RCA and Monitor outs are mirrored and they share the same signal, but you can
connect 2 pairs of speakers at the same time.

Vielen Dank, dass Sie sich für Antelope Audio entschieden haben!

Diese Kurzanleitung hilft Ihnen weiter, Ihr neues Zen Go Synergy Core-Interface zu aktivieren und die dazugehörige Software herunterzuladen. Der Abschluss des Prozesses ist erforderlich, um Ihre Produktgarantie zu bestätigen um Zugriff auf spezielle Softwarepakete und exklusive Produktangebote zu erhalten.

Um Ihr Produkt freizuschalten, folgen Sie bitte den aufgeführten Anweisungen. Bitte beachten Sie, dass für eine erfolgreiche Produktaktivierung eine Internetverbindung erforderlich ist.

Schau Dir das Tutorial-Video zum Aktivierungsprozess an oder folge den unten aufgeführten Schritten.

Schritt 1: Einstieg

Verbinden Sie das Audiointerface mit dem mitgelieferten USB-Kabel an Ihrem Windows-oder Apple-Rechner.

Get started step1 new

Hinweis:

  • • Das Zen Go Synergy Core ist ein USB-C bus-powered Audio-Interface und erfordert stetige Stromversorgung vom Rechner. Es wird empfohlen, Anschlüsse wie USB 3, USB 3,1/USB-C zu verwenden, die sich auf dem Motherboard befinden, meistens auf der Rückseite des Computers. Die Verwendung von Hilfsanschlüssen, normalerweise an der Vorderseite des PCS, kann aufgrund unzureichender Stromversorgung zu hörbaren Störungen des Audioausgangs und Leistungsproblemen führen.
  • • USB 2 Ports können weiterhin verwendet werden, aber keine ausreichende Stromversorgung garantieren. Das Interface benötigt mindestens 700 mA Power – ein Standard-USB 2.0-Anschluss mit 500 mA reicht nicht aus. Eine zu schwache Stromunterversorgung kann zum Summen der Ausgänge oder leistungsbezogenen Problemen führen. In solchen Fällen empfehlen wir, dass Sie den Port wechseln oder einen aktiven Hub verwenden. Bitte beachten Sie, dass der Hub Netzstrom verwenden muss, anstatt bus-powered zu funktionieren. Sie können das Zen Go Synergy Core als eigenständiges Gerät verwenden, indem Sie den zusätzlichen USB-C – Anschluss benutzen, der nur für die Stromversorgung gedacht ist.
Difference Between USB Ports
How to Resolve Ground Loop Issues

Schritt 2: Melden Sie sich bei Ihrem Antelope Audio Benutzerkonto an

Gehen Sie auf www.antelopeaudio.com und loggen Sie sich ein. Wenn Sie noch kein Konto haben, erstellen Sie bitte eins. Klicken Sie hier, um mit dem Anmeldeformular und dem Registrierungsprozess fortzuschreiten.

login area

Schritt 3: Aktivieren Sie Ihr Audio Interface

Sobald Sie sich angemeldet haben, gehen Sie zu Ihrem Konto Dashboard und klicken Sie auf Activate New Device.

activationnew

Wählen Sie Ihr Gerät aus der Liste und laden Sie den Antelope Launcher für Mac oder Windows herunter. Installieren Sie die Anwendung mithilfe der Anweisungen auf dem Bildschirm und starten Sie den Antelope Launcher.

snip

Melden Sie sich mit Ihrem Antelope Audio Konto an. Ihr Audio Interface sollte im Menü Devices aufgeführt sein. Klicken Sie auf Activate Device und folgen Sie den Anweisungen auf dem Bildschirm. Das Gerät wird nach erfolgreicher Aktivierung neu gestartet.

launcher activate

Herzlichen Glückwunsch! Ihr Audio Interface ist jetzt aktiviert. Die Produktaktivierung ist ein einmaliger Vorgang nach dessen Abschluss Sie diesen nicht wiederholen müssen.

Schritt 4: Software Update

Nach erfolgreicher Aktivierung kommt der letzten Schritt bevor Sie Ihr Interfase verwenden zu können. Aktualisieren Sie das Zen Go Synergy Core auf die neuesten Firmware -, Treiber-und Control Panel-Versionen. Öffnen Sie dazu den Antelope Launcher, gehen Sie zur Bundle-Version und wählen Sie die neueste Version aus der Liste.

bundlever

Klicken Sie auf Update und folgen Sie den Anweisungen auf dem Bildschirm. Das Gerät wird nach einem erfolgreichen Update neu gestartet. Dies zeigt an, dass das Interface voll funktionsfähig ist und mit der neuesten Systemsteuerung, dem aktuellen Treiber und Firmware-Versionen ausgestattet ist.

Schritt 5: Aktivierung der Produktgarantie

Schließlich müssen Sie Ihre Produktgarantie aktivieren. Dies erfolgt über My Warranty in My Antelope Account.

1

Wenn Sie Ihr Produkt erfolgreich aktiviert haben, sollte es jetzt unter My Warranty erscheinen. Klicken Sie auf Add Warranty.

2

Auf dem folgenden Bildschirm werden Sie aufgefordert, Informationen zu Ihrem neuen Gerät einzugeben und Ihre Garantie beizufügen. Sie können mehrere Dateien (bis zu fünf) mit dem Pluszeichen hinzufügen. Akzeptable Formate sind: PDF, .jpg, .png, .jpeg, .gif, und die Größenbeschränkung beträgt 7 MB pro Datei. Sobald Sie die Schritte abgeschlossen haben, klicken Sie auf Add Warranty.

3

Nach einem erfolgreichen Abschluss des Vorgangs klicken Sie auf  View Warranty, um sicher zu gehen, dass Ihre Datei korrekt hochgeladen wurde.

Download the Zen Go Synergy Core user manual

Finde jetzt heraus, wie Du das Control Panel verwenden und Deine erste Session einrichten kannst:

System Requirements

Mac:

  • • Apple Mac 2012 or newer with USB 2.0/3.0/3.1 port (native or using an adapter)
  • • Minimum: Mac OS X 10.12 Sierra. Recommended: Mac OS X 11.02Big Sur
  • • Available storage space(Minimum 4 GB)
  • • Memory (RAM): 4 GB minimum (8 GB or more recommended)

Windows:

  • • PC computer with USB 2.0/3.0/3.1 port
  • • Windows 10 (64-bit) with latest Microsoft Updates
  • • Available storage space (Minimum 4 GB)
  • • Memory (RAM): 4 GB minimum (8 GB or more recommended)
  • • CPU: Intel Core i3™ or AMD FX (Higher recommended)

Additional Information:

  • • Stable Internet connection is required to download and update your Antelope Audio Software

Brauchen Sie Hilfe?

Besuchen Sie die Antelope Audio Kundensupport Seite, wählen Sie Ihr Gerät und finden Sie die erforderlichen Informationen.

Merci d’avoir choisi Antelope Audio!

Ce guide de démarrage rapide vous aidera à activer votre nouvelle interface Zen Go Synergy Core et à télécharger tous les logiciels qui l’accompagnent. L’achèvement du processus est nécessaire pour valider la garantie de votre produit et accéder à des progiciels spéciaux et à des offres de produits exclusifs.

Pour activer votre produit, assurez-vous de suivre les instructions répertoriées. Gardez à l’esprit qu’une connexion Internet est nécessaire pour une activation réussie du produit.

Regardez la vidéo du didacticiel ci-dessous pour une explication de l’ensemble du processus d’activation ou suivez les étapes ci-dessous.

Étape 1: Premiers pas

Connectez l’interface audio à votre ordinateur Windows ou Mac à l’aide du câble USB fourni.

Get started step1 new

Note:

  • • Zen Go Synergy Core est une interface alimentée par bus USB-C et nécessite donc une alimentation constante des ports de l’ordinateur. Il est recommandé d’utiliser des ports tels que USB 3, USB 3.1 / USB-C situés sur la carte mère, qui sur les PC sont généralement placés à l’arrière du boîtier de l’ordinateur. L’utilisation de ports auxiliaires, généralement à l’avant du PC, peut entraîner des interférences audibles sur le son de sortie et des problèmes de performances en raison d’une alimentation insuffisante.
  • • Même si les ports USB 2 peuvent encore être utilisés, certains peuvent ne pas fournir suffisamment d’énergie. L’interface nécessite au moins 700 mA d’alimentation – cela signifie qu’un port USB 2.0 standard avec 500 mA n’est pas suffisant. En plus de ne pas pouvoir du tout alimenter l’appareil, cela peut également entraîner un bourdonnement des sorties ou des problèmes de performances. Dans de tels cas, il est conseillé de basculer sur un autre port ou d’utiliser un concentrateur USB alimenté en externe. Veuillez noter que le concentrateur doit utiliser l’alimentation secteur au lieu d’être alimenté par le bus. Vous pouvez utiliser le Zen Go Synergy Core en tant qu’appareil autonome en utilisant le port USB-C supplémentaire – utilisé uniquement pour l’alimentation électrique.
Difference Between USB Ports
Read How to Resolve Ground Loop Issues

Étape 2: Connectez-vous à votre compte utilisateur Antelope Audio

Visitez www.antelopeaudio.com et connectez-vous. Si vous n’avez pas encore de compte, il sera nécessaire d’en créer un. Cliquez içi pour procéder au formulaire d’inscription et au processus d’inscription.

login area

Étape 3: activez votre interface audio

Une fois connecté, accédez à votre compte Dashboard et cliquez sur Activate New Device.

activationnew

Sélectionnez votre appareil dans la liste et téléchargez Antelope Launcher pour Mac ou Windows. Installez l’application en suivant les instructions à l’écran et démarrez Antelope Launcher.

snip

Connectez-vous avec votre compte Antelope Audio. Votre interface doit être répertoriée dans le menu Devices. Cliquez sur Activer l’appareil et suivez les instructions sur l’écran. L’appareil redémarrera après une activation réussie.

launcher activate

Félicitations, votre interface est maintenant activée. L’activation du produit est un processus unique et une fois terminé, vous ne serez pas obligé de le refaire.

Étape 4: Mise à jour du logiciel

Une fois l’activation réussie, il est temps de terminer la dernière étape avant de pouvoir utiliser votre interface: mettre à jour le Zen Go Synergy Core avec les dernières versions du micrologiciel, du pilote et du panneau de configuration. Pour ce faire, ouvrez Antelope Launcher, accédez à Bundle Version et sélectionnez la dernière version dans la liste.

bundlever

Cliquez sur Mettre à jour et suivez les instructions à l’écran. L’appareil redémarrera après une mise à jour réussie. Cela indiquera que l’interface est pleinement opérationnelle et chargée avec les dernières versions du panneau de commande, du pilote unifié et du micrologiciel.

Etape 5: Activer votre garantie de produit

Enfin, vous devrez activer votre garantie de produit. Cela s’effectue depuis l’onglet My Warranty dans My Antelope Account.

1

Si vous avez déjà activé votre produit, il devrait maintenant apparaître dans My Warranty. Cliquez sur Add Warranty.

2

Sur l’écran suivant on vous demandera de rentrer les informations à propos de votre nouveau matériel et d’y attacher votre garantie. Vous pouvez ajouter plusieurs fichiers (jusqu’à cinq) en utilisant le signe +. Les formats acceptés sont .pdf, .jpg, .png, .jpeg, .heif, et la limite de taille est de 7 MB par fichier. Après avoir suivi ces étapes cliquez sur Add Warranty.

3

Lorsque la procédure est complète vous pouvez cliquer sur View Warranty pour vérifier si votre fichier a été téléchargé correctement.

Télécharger le manuel d'utilisation
Vous pouvez maintenant apprendre à utiliser le panneau de configuration et à configurer votre première session:

System Requirements

Mac:

  • • Apple Mac 2012 or newer with USB 2.0/3.0/3.1 port (native or using an adapter)
  • • Minimum: Mac OS X 10.12 Sierra. Recommended: Mac OS X 11.02Big Sur
  • • Available storage space(Minimum 4 GB)
  • • Memory (RAM): 4 GB minimum (8 GB or more recommended)

Windows:

  • • PC computer with USB 2.0/3.0/3.1 port
  • • Windows 10 (64-bit) with latest Microsoft Updates
  • • Available storage space (Minimum 4 GB)
  • • Memory (RAM): 4 GB minimum (8 GB or more recommended)
  • • CPU: Intel Core i3™ or AMD FX (Higher recommended)

Additional Information:

  • • Stable Internet connection is required to download and update your Antelope Audio Software

Besoin d’aide?

Visitez la page d’assistance à la clientèle d’Antelope Audio, choisissez votre appareil et recherchez les informations requises.

Grazie per aver scelto Antelope Audio!

Questa guida rapida ti aiuterà ad attivare la tua nuova interfaccia Zen Go Synergy Core e a scaricare tutto il software necessario. E’ importante completare il processo di attivazione per convalidare la garanzia del prodotto e ottenere l’accesso ai pacchetti software e alle offerte dei prodotti.

Per attivare il tuo prodotto, assicurati di seguire le istruzioni elencate. E’ necessaria una connessione Internet per la corretta l’attivazione del prodotto.

Guarda il video tutorial di seguito per una spiegazione dell’intero processo di attivazione o segui i passaggi elencati di seguito.

Passaggio 1: Guida introduttiva

Collega l’interfaccia audio al tuo computer Windows o Mac utilizzando il cavo USB in dotazione.

Get started step1 new

Note:

  •  • Zen Go Synergy Core è un’interfaccia alimentata dal bus USB-C e richiede un’alimentazione costante dalle porte del computer. Si consiglia di utilizzare porte USB 3, USB 3.1 / USB-C che si trovano sulla scheda madre e sui PC sono solitamente posizionate sul retro del case del computer. L’utilizzo di porte ausiliarie, di solito poste sulla parte anteriore del PC, può causare interferenze udibili sull’audio in uscita e problemi di prestazioni a causa della potenza insufficiente.
  •  • Anche se le porte USB 2 possono ancora essere utilizzate, in alcuni casi potrebbero non fornire energia sufficiente. L’interfaccia richiede almeno 700 mA di alimentazione: questo significa che una porta USB 2.0 standard con 500 mA non è sufficiente. Oltre a non alimentare il dispositivo, può anche provocare un ronzio dalle uscite o problemi di prestazioni. In questi casi, si consiglia di passare a una porta diversa o di utilizzare un hub USB alimentato esternamente. Si noti che l’hub deve utilizzare l’alimentazione di rete invece di essere alimentato dal bus. È possibile utilizzare Zen Go Synergy Core come dispositivo autonomo utilizzando la porta USB-C aggiuntiva, utilizzata solo per l’alimentazione.
Difference Between USB Ports
Read How to Resolve Ground Loop Issues

Passaggio 2: Accedi al tuo account utente di Antelope Audio

Visitа www.antelopeaudio.com e accedi. Se non si dispone già di un account, sarà necessario crearne uno. Fare clic qui per procedere al modulo di iscrizione e al processo di registrazione.

login area

Passaggio 3: Attiva la tua interfaccia audio

Dopo aver effettuato l’accesso, vai alla “Dashboard” del tuo account e fai clic su Attiva nuovo dispositivo.

activationnew

Seleziona il tuo dispositivo dall’elenco e scarica Antelope Launcher per Mac o Windows. Installa l’applicazione utilizzando le istruzioni sullo schermo e avvia Antelope Launcher.

snip

Accedi con il tuo account Antelope Audio. La tua interfaccia dovrebbe essere elencata nel menu Dispositivi. Fai clic su Attiva dispositivo e procedi con le istruzioni sullo schermo. Il dispositivo verrà riavviato dopo l’attivazione.

launcher activate

Congratulazioni, la tua interfaccia è ora attivata. L’attivazione del prodotto è un processo unico e una volta completato, non ti verrà richiesto di farlo di nuovo.

Passaggio 4: Aggiornamento del software

Dopo l’attivazione è il momento di completare il passaggio finale, aggiornare Zen Go Synergy Core alle ultime versioni di firmware, driver e pannello di controllo. Per fare ciò, apri Antelope Launcher, vai su Bundle Version e seleziona l’ultima versione dall’elenco.

bundlever

Fai clic su Aggiorna e segui le istruzioni sullo schermo. Il dispositivo verrà riavviato dopo l’ aggiornamento. Ciò indica che l’interfaccia è completamente operativa e caricata con le ultime versioni del pannello di controllo, del driver unificato e del firmware.

Passagio 5: Attiva la garanzia del tuo prodotto

Ti verrà richiesto di attivare la garanzia del prodotto. La procedura viene completata accedendo alla scheda My warranty ne My Antelope Account.

1

Se hai attivato con successo il tuo prodotto, ora dovrebbe apparire sotto My Warranty. Fai click su Add Warranty.

2

Nella schermata successiva ti verrà chiesto di inserire le informazioni sul tuo nuovo dispositivo e di allegare la tua garanzia. Puoi aggiungere più file (fino a cinque) utilizzando il segno più. I formati accettabili sono .pdf, .jpg, .png, .jpeg, .heif e il limite di dimensione è 7 MB per file. Una volta completati i passaggi, fai click su Add Warranty.

3

Dopo aver completato con successo il processo, puoi fare click su View Warranty per vedere se il tuo file è stato caricato correttamente.

SCARICA IL MANUALE D'USO

You can now move on to learn how to use the Control Panel and set up your first session:

System Requirements

Mac:

  • • Apple Mac 2012 or newer with USB 2.0/3.0/3.1 port (native or using an adapter)
  • • Minimum: Mac OS X 10.12 Sierra. Recommended: Mac OS X 11.02Big Sur
  • • Available storage space(Minimum 4 GB)
  • • Memory (RAM): 4 GB minimum (8 GB or more recommended)

Windows:

  • • PC computer with USB 2.0/3.0/3.1 port
  • • Windows 10 (64-bit) with latest Microsoft Updates
  • • Available storage space (Minimum 4 GB)
  • • Memory (RAM): 4 GB minimum (8 GB or more recommended)
  • • CPU: Intel Core i3™ or AMD FX (Higher recommended)

Additional Information:

  • • Stable Internet connection is required to download and update your Antelope Audio Software

Hai bisogno di qualche aiuto?

Visita la pagina dell’assistenza clienti di Antelope Audio, scegli il tuo dispositivo e trova le informazioni richieste.

感谢您选择羚羊音频产品!

本快速使用指南将指导您激活Zen Go Synergy Core音频接口,并下载安装所有相关软件。要激活您的设备,请务必按照以下说明进行操作。请注意,成功激活产品需要您的电脑连接到互联网。

点击此处可观看视频教程,了解有关整个激活过程的说明。

第1步:准备

使用附带USB线缆将音频接口连接到您的Windows或Mac电脑。

Get started step1 new

提示:

  • • Zen Go Synergy Core是一款USB-C总线供电的音频接口。因此,它需要电脑的USB端口能够稳定、足额供电。我们推荐将该设备连接到USB 3.0、USB3.1或USB-C端口。对于台式机来说,这些端口通常位于电脑机箱的背面。而机箱正面的辅助USB端口可能会由于供电不足而导致设备出现杂音,并造成性能下降等问题。
  • • USB 2.0端口仍可作为数据端口使用,但无法足额供电。该设备至少需要700 mA的电流 – 这意味着标准USB 2.0端口的500 mA电流无法维持设备的正常运行。供电不足可能导致设备无法启动,或者使设备出现杂音、性能下降等问题。此时,建议您将设备连接到其他适用的USB端口或使用有源的USB Hub。当然,您也可以通过设备的辅助USB-C端口连接外部电源来使用。
Difference Between USB Ports
Read How to Resolve Ground Loop Issues

第2部:登录您的羚羊音频账号

请访问羚羊音频官网 www.antelopeaudio.com 并登录。如果您还没有自己的羚羊音频账号,则需要注册。 点击这里 进行注册操作。

login area

第3步:激活你的音频接口

登录后,打开My Account,然后在Dashed中点击Activate New Device

activationnew

从列表中选择Zen Go Synergy Core,然后下载适用于Windows或Mac的Antelope Launcher。下载后进行安装,接着启动Antelope Launcher。

snip

在Launcher中登录您的羚羊账号,您的音频接口将在出现在设备列表当中。点击Activate Device然后按照屏幕上的说明进行操作。成功激活后,设备将重新启动。

launcher activate

Congratulations, your audio interface is now activated. Product activation is a one-time process and once completed, you will not be required to do it again.

第4步:安装驱动和控制面板

激活成功之后,我们还需要完成最后一个步骤:为Zen Go安装最新的固件、驱动以及控制面板。请打开Antelope Launcher,在Bundle Version中选择最新版本,然后点击update,随后请按照屏幕上的说明进行操作。

bundlever

安装成功后,设备将重新启动,这表明该音频接口已加载了最新版本的固件、驱动和控制面板,已经能够正常运行。

第5步:激活您的产品保修

最后,您需要激活您的产品保修。请在羚羊官网的My Antelope Account – My Warranty页面中完成激活。

1

如果您已成功激活您的产品,此刻它应该出现在My Warranty页面中。点击右侧的Add Warranty按钮即可添加保修信息。

2

在接下来的页面中,您需要添加有关新设备的信息。包括Date of Purchase – 购买日期和Proof of Purchase – 购买凭证,您可以使用加号添加多个文件(最多5个文件), 可接受的格式有 .pdf、.jpg、.png、.jpeg、.heif,每个文件的大小限制为 7 MB。 完成这些步骤后,点击Add Warranty即可完成保修激活。

3

成功完成上述步骤后,您可以点击View Warranty来查看您的文件是否已正确上传。

Download the Zen Go Synergy Core user manual

You can now move on to learn how to use the Control Panel and set up your first session:

System Requirements

Mac:

  • • Apple Mac 2012 or newer with USB 2.0/3.0/3.1 port (native or using an adapter)
  • • Minimum: Mac OS X 10.12 Sierra. Recommended: Mac OS X 11.02Big Sur
  • • Available storage space(Minimum 4 GB)
  • • Memory (RAM): 4 GB minimum (8 GB or more recommended)

Windows:

  • • PC computer with USB 2.0/3.0/3.1 port
  • • Windows 10 (64-bit) with latest Microsoft Updates
  • • Available storage space (Minimum 4 GB)
  • • Memory (RAM): 4 GB minimum (8 GB or more recommended)
  • • CPU: Intel Core i3™ or AMD FX (Higher recommended)

Additional Information:

  • • Stable Internet connection is required to download and update your Antelope Audio Software

需要帮助?

请访问羚羊客户支持页面,选择您的设备并找到所需的信息。

您也可指扫描下方二维码,添加我们的微信技术支持。

WeChat QR Code

Thank you for choosing Antelope Audio!

このクイックスタートガイドでは、Zen Go Synergy Core インターフェイスをアクティベーション (製品登録) をし、付属のソフトウェアをダウンロードします。

このプロセスを実行する必要性は、製品保証の有効性を確認し、特別なソフトウェアパッケージや限定製品オファーへのアクセス権を得るために必要です。

製品をアクティベーションするには、記載されている手順に従ってください。 製品のアクティベーションを成功させるには、インターネット接続が必要です。

製品アクティベーションのやり方につきましては以下の説明動画をご覧下さい。あるいは以下の手順にお従い下さい。

Step 1: Getting Started

付属の USB ケーブルを使用して、オーディオインターフェイスを Windows または Apple Mac コンピュータに接続します。

Get started step1 new

⚠ 注意:

  • • Zen Go Synergy Core は USB-C バスパワー駆動のインターフェースであるため、パソコンのポートから安定した電力を必要とします。USB 3、USB 3.1/USB-C など、PC ケースの背面にある、マザーボードに搭載されているポートを使用することをお勧めします。なお、PC の前面にある AUX ポートを使用すると出力される音声に干渉が生じたり、電力不足によるパフォーマンスの低下を招く恐れがあります。
  • • USB 2 ポートの使用は不可能ではありませんが、十分な電力を供給できない場合があります。当インターフェースは少なくとも 700mA の電力を必要とするため、500mA の標準的な USB 2.0 ポートでは十分ではありません。デバイスにまったく電源が供給されないだけでなく、出力からハムノイズが発生したり、パフォーマンスに関する問題が発生することもあります。このような場合には、別のポートに切り替えるか、外部電源付きのUSB ハブを使用することをお勧めします。ハブはバスパワーではなく、主電源を使用する必要がありますのでご注意ください。Zen Go Synergy Core は電源供給のみに使用される追加の USB-C ポートを使用することで、スタンドアロンデバイスとして使用することができます。
Difference Between USB Ports
Read How to Resolve Ground Loop Issues

Step 2: Log-in to your Antelope Audio User Account

login area

Step 3: Activate your Audio Interface

ログインしたら、アカウントの「Dashboard」に移動し、「Activate New Device」をクリックします。

activate device

リストからお使いのデバイスを選択し、Mac または Windows 用の Antelope Launcher をダウンロードしてください。画面の指示に従ってアプリケーションをインストールし、Antelope Launcher を起動します。

⚠ アプリケーションがコンピュータのセキュリティの問題で正常にインストール、動作しないケースが跡を絶ちません。必ずご自身の利用されるコンピュータのセキュリティ項目で Antelope Audio のアプリケーションがブロックされていないかご確認ください。

トラブルシュートに関しての詳細は Antelope Launcher 解説 のページをご確認ください。

snip 1

Antelope Audio アカウントでログインしてください。お使いのインターフェースが 「Devices 」メニューに表示されているはずです。「Activate Device」をクリックし、画面上の指示に従ってください。デバイスのアクティベーションが成功すると、デバイスが再起動します。

アクティベーションの詳細は こちら からご確認ください。

launcher activate

Congratulations! 製品のアクティベーションは一度だけのプロセスで、一度完了した後は、再度アクティベーションを行う必要はありません。

Step 4: Software Update

アクティベーションが成功したら、インターフェースを使用する前の最後のステップである、Zen Go Synergy Core を最新のファームウェア、ドライバ、コントロールパネルのバージョンにアップデートする作業を行います。これを行うには、Antelope Launcher を開き、Bundle Version に移動し、リストから最新バージョンを選択します。

bundlever

アップデートをクリックし、画面の指示に従います。アップデートが成功すると、デバイスが再起動します。これは、インターフェイスが完全に動作し、最新のコントロールパネル、ドライバ、ファームウェアのバージョンがロードされていることを示します。

アップデードには正しい手順が必要な場合があります。もし、アップデートが成功しない場合は こちら のページを必ずご確認し、再度セットアップを行ってください。

⚠ 最後に OS 側のキャリブレーション確認をご確認ください。OS の機能により、製品が正常に動作しません。それらを回避するために こちらのページ から設定手順を必ずご確認ください。

Step 5: 製品保証のアクティベート

最後に製品保証をアクティベートする必要があります。これは My Antelope AccountMy Warranty タブから行います。

1

製品のアクティベーションが完了していれば My Warranty に製品が表示されます。Add Warranty をクリックします。

2

次の画面では新しいデバイスに関する情報の入力と、保証書の添付が求められます。プラス記号を使って複数のファイル(最大5つ)を追加することができます。使用可能なフォーマットは、.pdf、.jpg、.png、.jpeg、.heifで、1つのファイルのサイズ制限は 7MB です。ステップが完了したら Add Warranty をクリックしてください。

3

プロセスが正常に完了した後 View Warranty をクリックすると、ファイルが正しくアップロードされたかどうかを確認することができます。

Download the Zen Go Synergy Core user manual

外部電源を使う方法

Zen Go Synergy Core は 2 つの USB-C ポートを備えています。AUSB ポートはオーディオストリーミングをやり取りするためのポートであり、もう片方の ポートは電源供給専用ポートです。電源供給には以下の操作が必要です。

  • 最初に AUSB に電源供給可能なデバイスやコンピュータと接続する。
  • 起動後、⚡ ポートにモバイルバッテリなど、サブの電源を接続する。
  • 本体 MON/HP ボタンを長押しして SYSTEM MENU の Power Source オプションを選択する。
  • Power B もしくは Charge device Power A from power B を選択する。

お手数ですが、以上の操作が必要です。

モバイル端末のセキュリティ設定により、チャージできない場合があります。各端末の設定項目 (USB アクセサリ等) を確認し、充電がモバイル端末側で実行されるように設定してください。後からモバイル端末を繋げるときは先に Power B を選択し、モバイル端末を接続し、再度 Chager Power A from B を選択してください。※ モバイル端末利用についてはサポート対象外のため、各個人でお楽しみください。

開封とセットアップガイド

コントロールパネルとルーティング解説

System Requirements

Mac:

  • • Apple Mac 2012 or newer with USB 2.0/3.0/3.1 port (native or using an adapter)
  • • Minimum: Mac OS X 10.12 Sierra. Recommended: Mac OS X 11.02Big Sur
  • • Available storage space(Minimum 4 GB)
  • • Memory (RAM): 4 GB minimum (8 GB or more recommended)

Windows:

  • • PC computer with USB 2.0/3.0/3.1 port
  • • Windows 10 (64-bit) with latest Microsoft Updates
  • • Available storage space (Minimum 4 GB)
  • • Memory (RAM): 4 GB minimum (8 GB or more recommended)
  • • CPU: Intel Core i3™ or AMD FX (Higher recommended)

Additional Information:

  • • Stable Internet connection is required to download and update your Antelope Audio Software

Need any help?

Visit the Antelope Audio Customer Support page, choose your device and find the required information.

Спасибо, что выбрали Antelope Audio!

Это краткое руководство поможет активировать ваш новый аудио-интерфейс Zen Go Synergy Core и загрузить всё сопутствующее программное обеспечение.

Завершение процесса необходимо для подтверждения гарантии на ваш продукт, а также для получения доступа к специальным программным пакетам и эксклюзивным предложениям наших продуктов.Чтобы активировать продукт, обязательно следуйте инструкциям.

Помните, что для успешной активации продукта требуется подключение к интернету.

Для подробного объяснения всего процесса активации просмотрите представленное ниже обучающее видео или выполните шаги перечисленные ниже.

Шаг 1: Начало работы

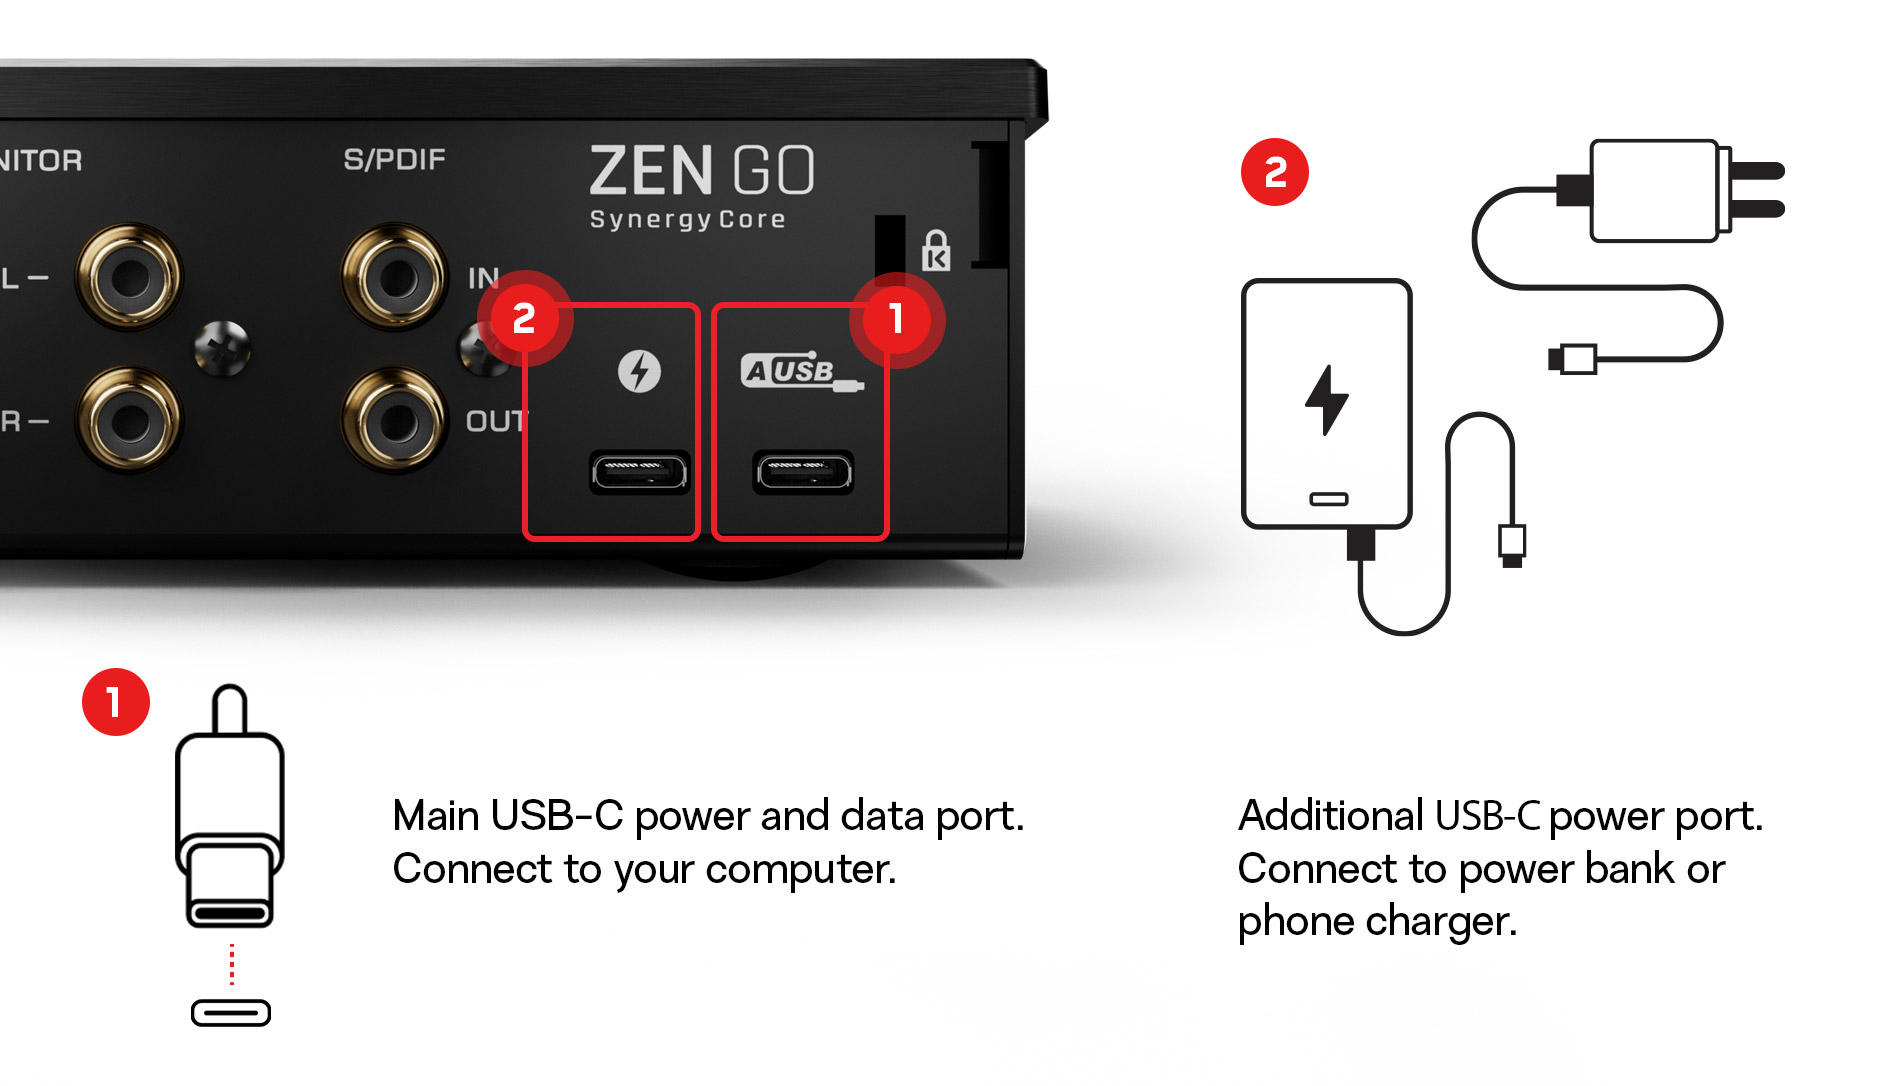
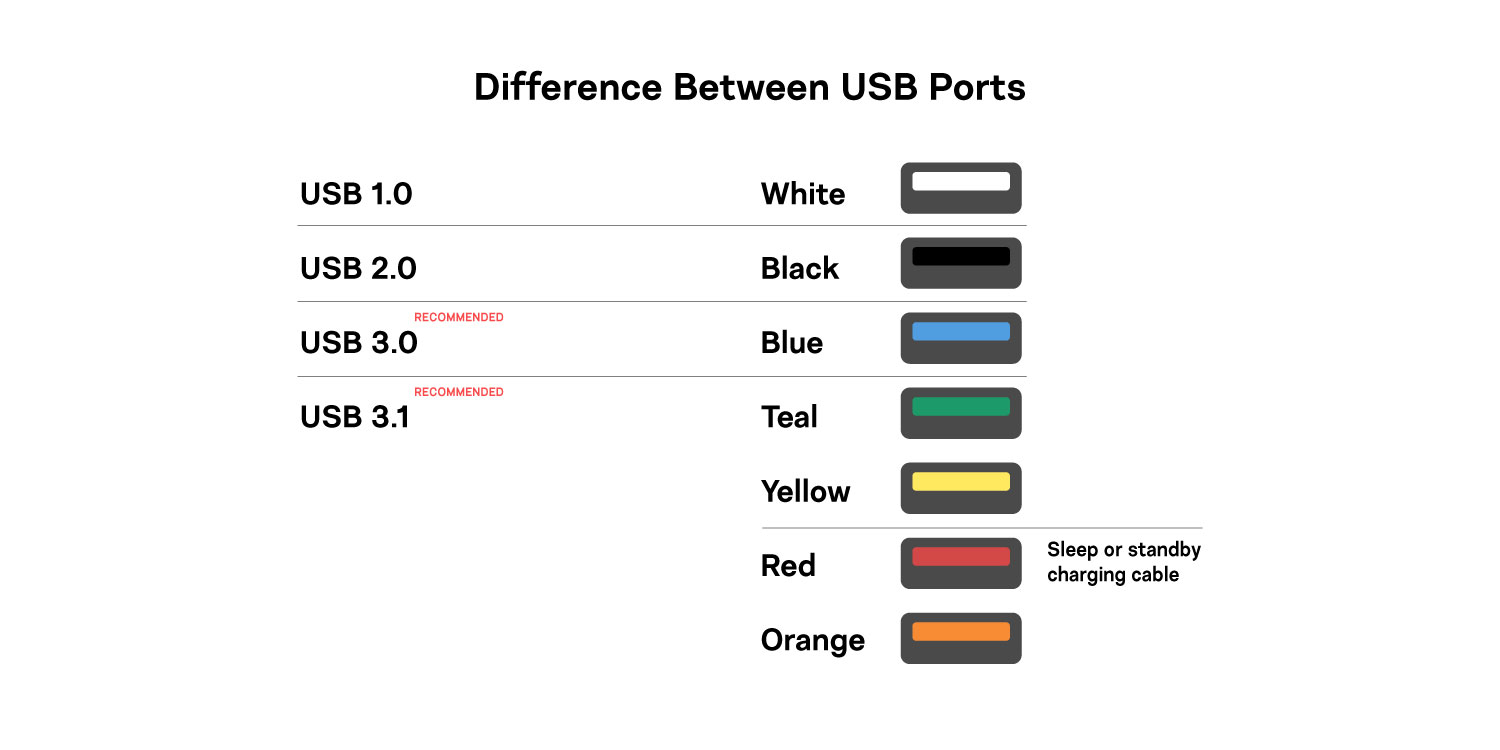
Подключите аудио-интерфейс к компьютеру под управлением Windows или Mac OS с помощью прилагаемого USB кабеля.

Get started step1 new

Примечание:

  •  • Zen Go Synergy Core – это интерфейс с питанием от шины USB-C, поэтому он требует стабильного питания от портов компьютера.Рекомендуется использовать USB 3, USB 3.1 / USB-C порты, которые расположены на материнской плате. На ПК они обычно размещаются на задней панели сисемного блока.Использование дополнительных портов на передней панели ПК может привести к слышимым помехам на выходе звука и проблемам с производительностью из-за недостаточной мощности.
  •  • Несмотря на то, что некоторые USB 2 порты могут использоваться, некоторые из них могут выдавать не достаточную мощность.Для питания аудио-интерфейс требует не менее 700 мА – это означает, что стандартного порта USB 2.0 с напряжением 500 мА будет недостаточно.Помимо того, что устройство не может быть достаточно подпитано, это также может привести к гудению от выходов или к проблемам, связанным с производительностью.В таких случаях рекомендуется переключиться на другой порт или использовать USB-концентратор с внешним питанием.Обратите внимание, что концентратор должен питаться от сети, а не от шины.Вы можете использовать Zen Go Synergy Core, как отдельное устройство используя дополнительный порт USB-C, который используется как источник питания.
Difference Between USB Ports
Панель управления программным обеспечением

Шаг 2: Войдите в свою учетную запись пользователя Antelope Audio.

Посетите сайwww.antelopeaudio.com и авторизируйтесь. Если у вас еще нет учетной записи, то необходимо создать её. Нажмите здесь, чтобы перейти к процессу регистрации.

login area

Шаг 3: Активируйте ваш аудио-интерфейс

activationnew

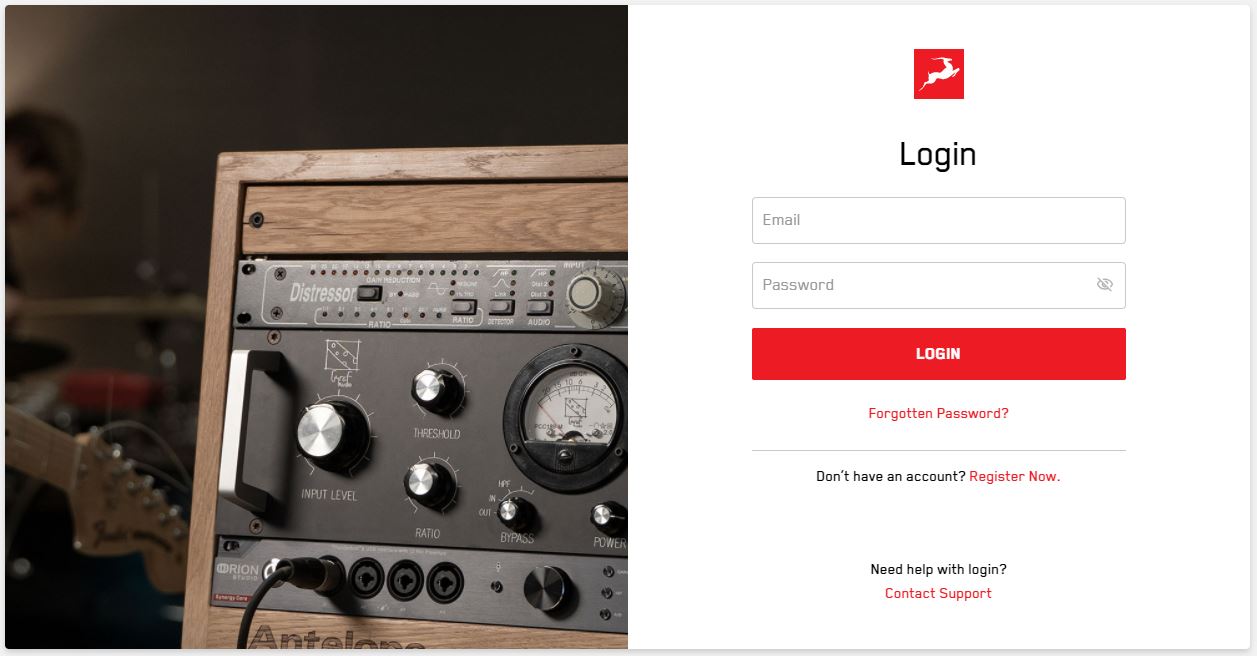
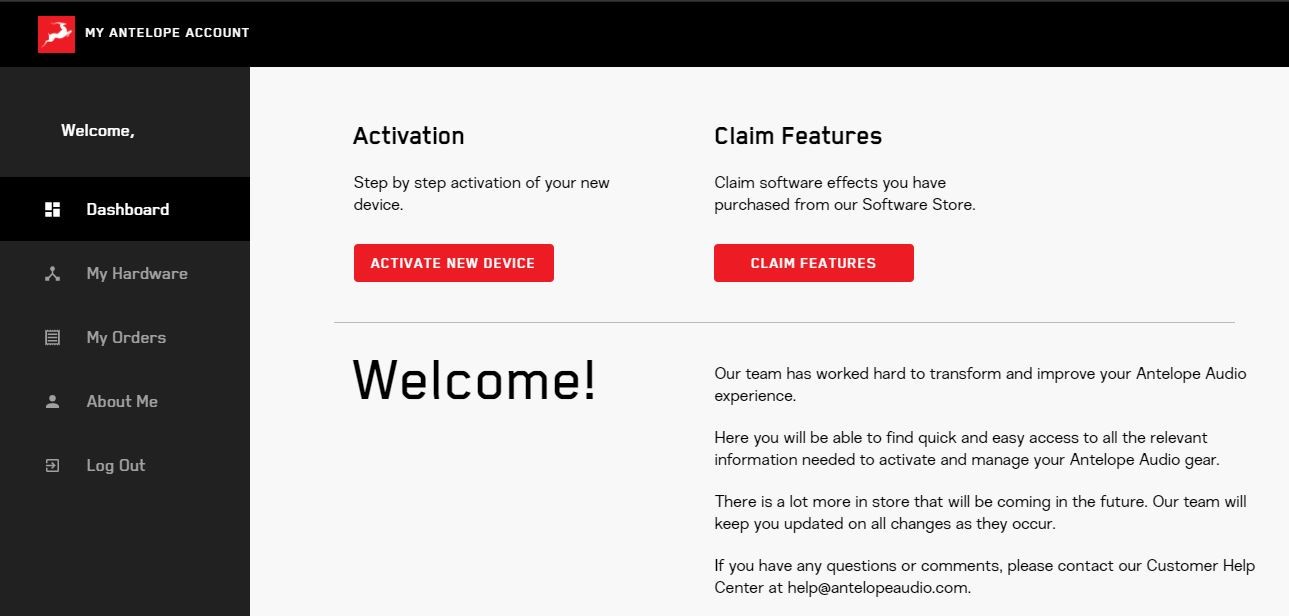
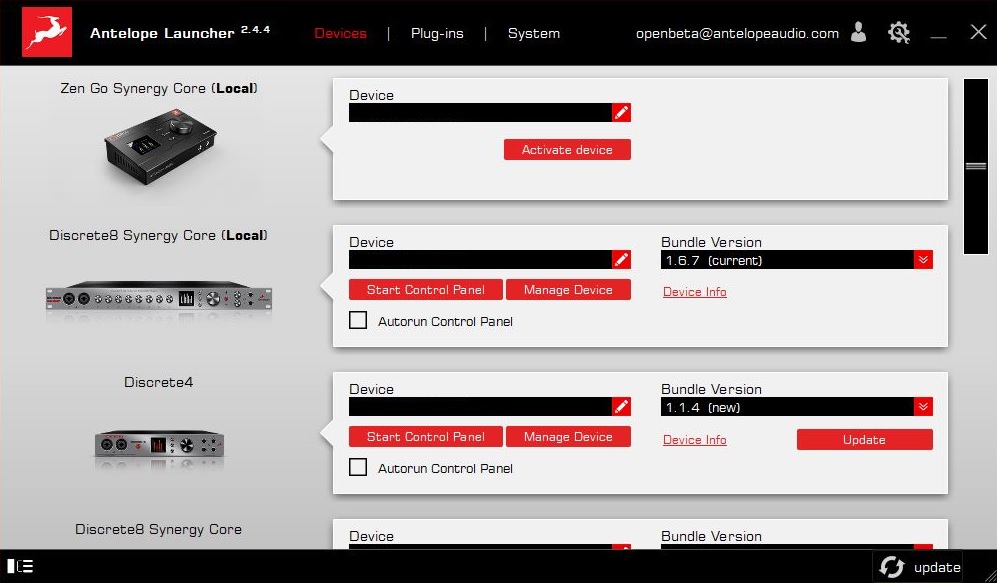
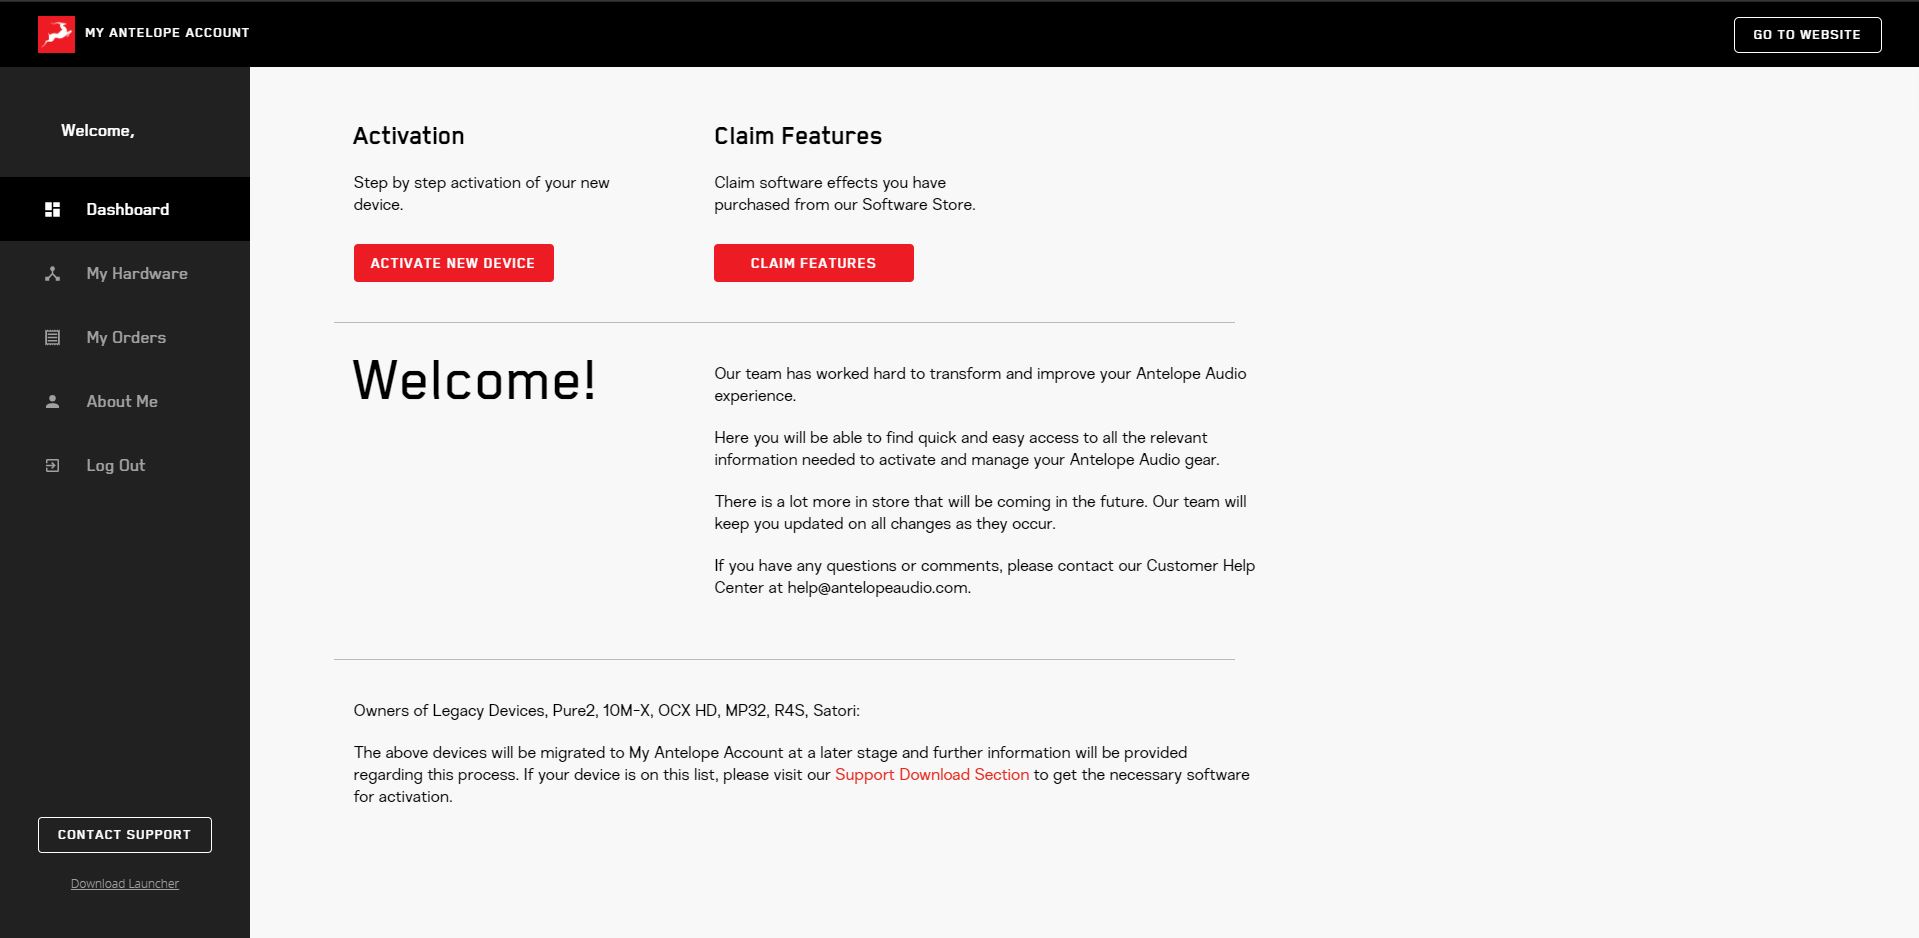
После входа в систему зайдите в свою учетную запись «Панель управления» и нажмите «Активировать новое устройство».

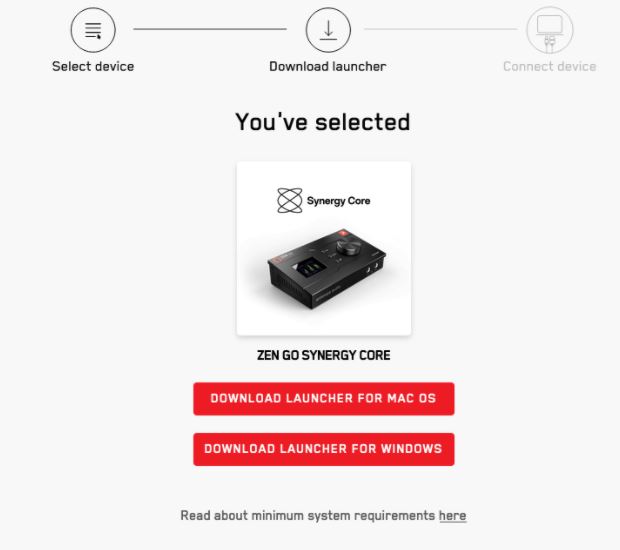
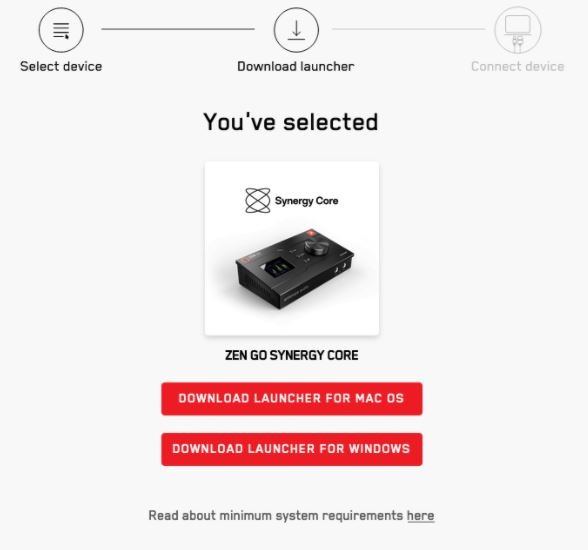
Выберите свое устройство из списка и загрузите Antelope Launcher для Mac или Windows. Установите приложение следуя инструкциям на экране и запустите программу запуска Antelope Launcher.

snip

Войдите в свою учетную запись Antelope Audio. Ваш интерфейс должен быть указан в меню «Устройства». Нажмите «Активировать устройство» и следуйте инструкциям на экране. После успешной активации устройство выполнит перезагрузку.

Поздравляем, ваш интерфейс активирован! Активация продукта – это однократный процесс и после его завершения вам не нужно будет повторно проделать эту операцию.

Шаг 4: Обновление программного обеспечения

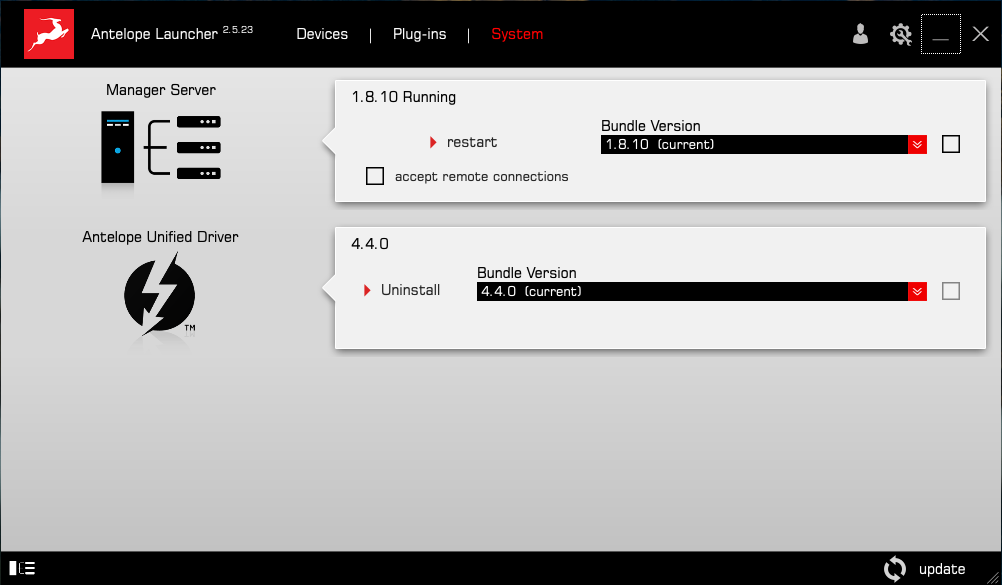
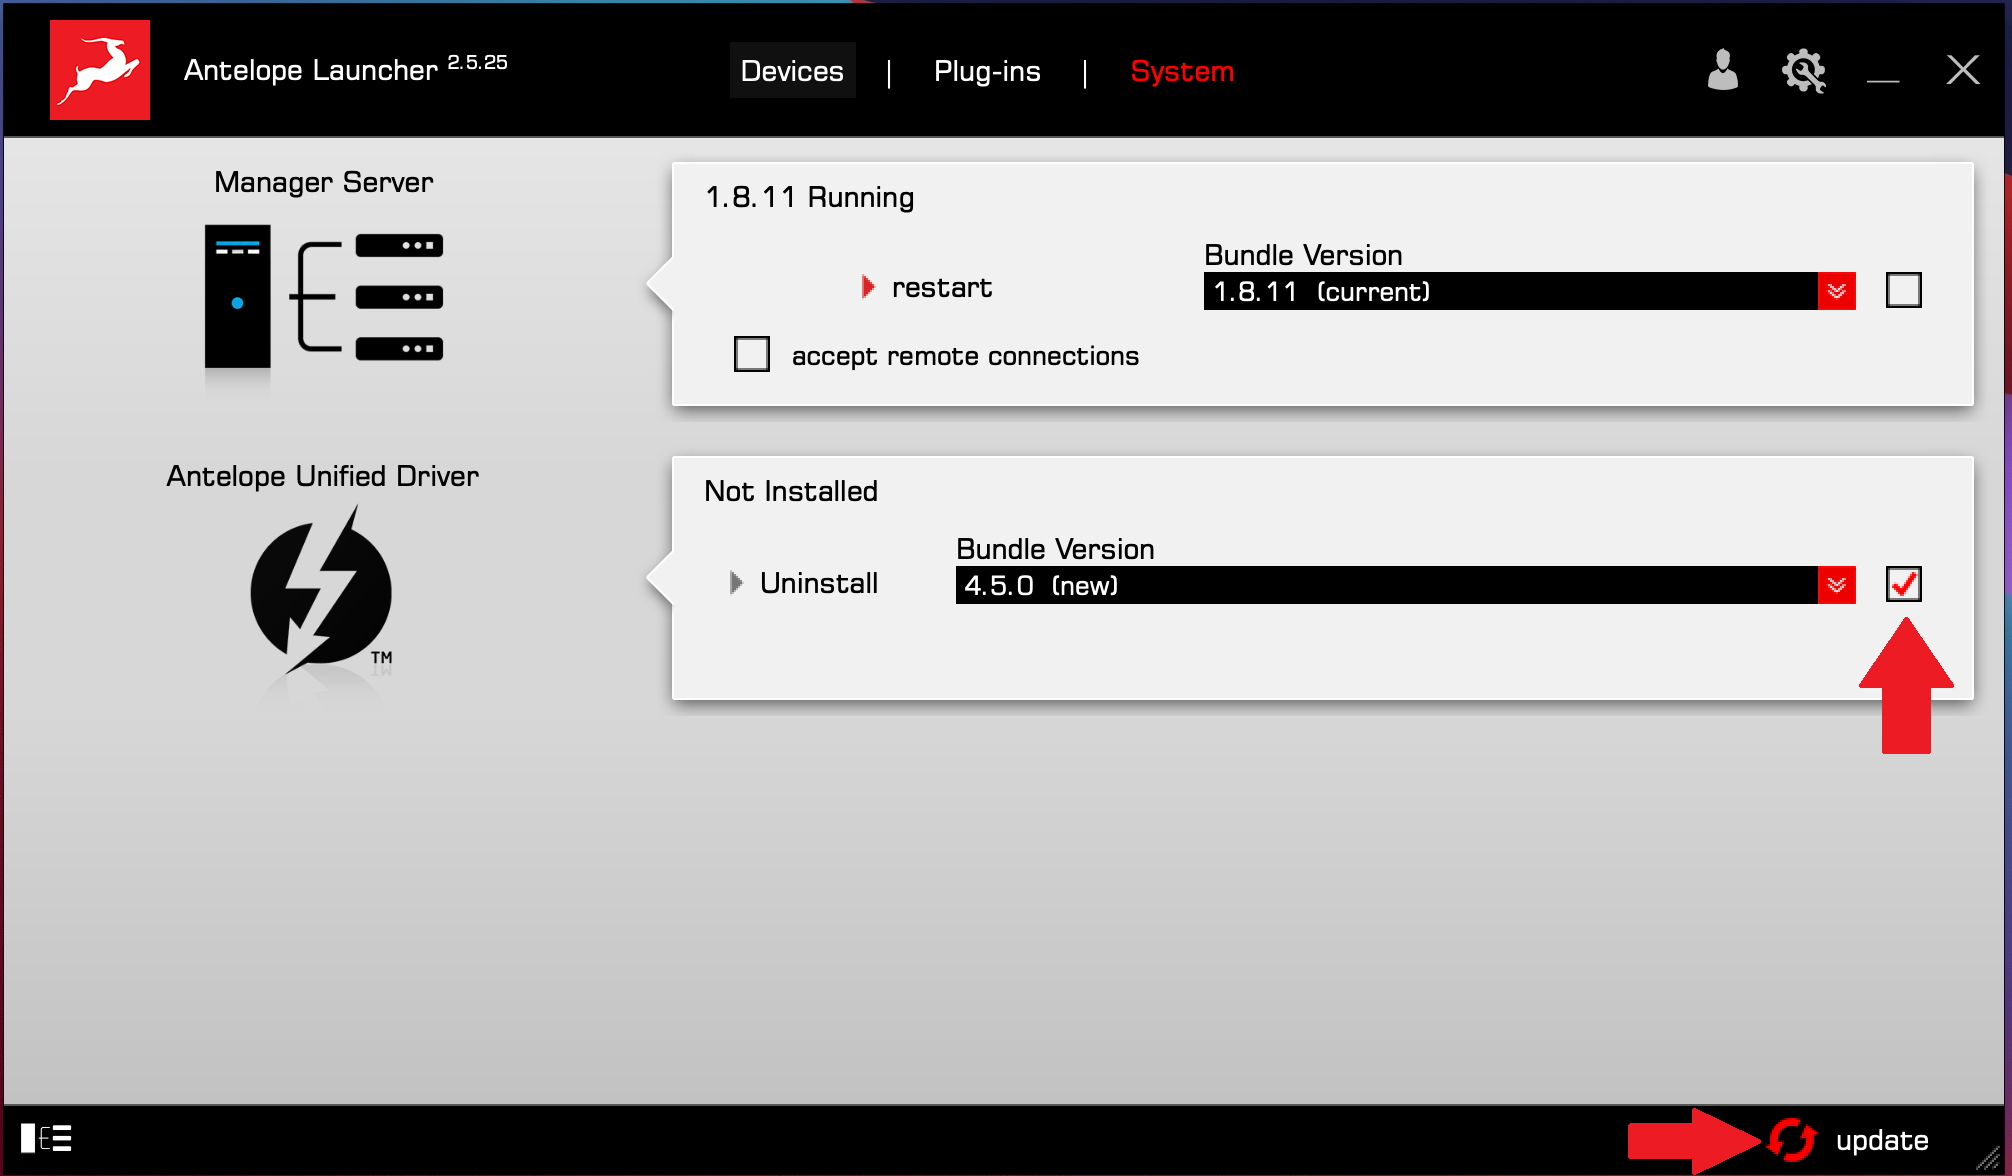
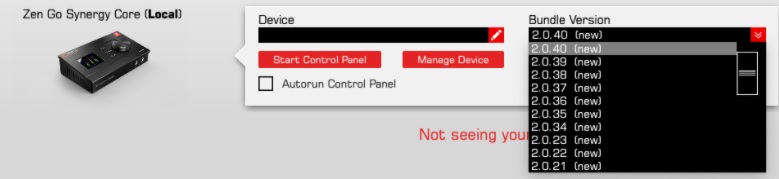
После успешной активации необходимо выполнить последний шаг, прежде чем использовать интерфейс необходимо обновить ваш Zen Go Synergy Core до последней версии прошивки, драйверов и панели управления.

Для этого откройте Antelope Launcher, перейдите в Bundle Version и выберите последнюю версию из списка.

Нажмите «Обновить» и следуйте инструкциям на экране.

После успешного обновления устройство перезагрузится.

Это будет означать, что ваш интерфейс полностью готов к работе и на нём установлены последние версии панели управления, унифицированного драйвера и прошивки.

Шаг 5: Активируйте гарантию на продукт

Наконец, вам потребуется активировать гарантию на продукт. Это делается во вкладке My Warranty в учетной записи My Antelope Account.

1

Если вы успешно активировали свой продукт, то он должен появиться в разделе My Warranty . Щелкните Add Warranty.

2

Далее будет предложено ввести информацию о вашем новом устройстве и приложить к нему гарантию. Вы можете добавить несколько файлов (до пяти), используя знак плюса. Допустимые форматы: .pdf, .jpg, .png, .jpeg, .heif. Максимальный размер файла – 7 МБ. После выполнения всех вышеперечисленных действий нажмите кнопку Add Warranty.

3

После успешного завершения процесса вы можете нажать View Warranty, чтобы проверить, правильно ли был загружен файл.

СКАЧАТЬ РУКОВОДСТВО ПОЛЬЗОВАТЕЛЯ

Теперь можно перейти к использованию панели управления и настройке первого сеанса:

Системные требования:

Mac:

  • • Apple Mac 2012 или новее и порт USB 2.0 / 3.0 / 3.1 (собственный или с использованием адаптера)
  • • Минимум: Mac OS X 10.12 Sierra. Рекомендуется: Mac OS X 11.02 Big Sur.
  • • Доступный объём для хранения (минимум 4 ГБ)
  • • Память (RAM): минимум 4 ГБ (рекомендуется 8 ГБ или больше)

Windows:

  • • ПК компьютер с портом USB 2.0 / 3.0 / 3.1
  • • Windows 10 (64-разрядная версия) с последними обновлениями Microsoft
  • • Доступное место для хранения (минимум 4 ГБ)
  • • Память (RAM): минимум 4 ГБ (рекомендуется 8 ГБ или больше)
  • • ЦП: Intel Core i3 ™ или AMD FX (рекомендуется выше)

Дополнительная информация:

  • • Для загрузки и обновления программного обеспечения Antelope Audio требуется стабильное подключение к Интернету.

Нужна помощь?

Посетите страницу поддержки клиентов Antelope Audio, выберите свое устройство и найдите необходимую информацию.

       FAQ:

Сколько чипов DSP есть в Zen Go Synergy Core?

Zen Go Synergy Core имеет 1 чип DSP, способный загружать 4 эффекта на отдельных полосах каналов.

Работает ли Zen Go Synergy Core с Thunderbolt?

Zen Go Synergy Core имеет порт USB-C, который совместим с портами Thunderbolt 3, но он будет работать как USB-устройство. Вам необходимо использовать кабель USB-C, чтобы подключить его к компьютеру Mac или Windows через порт USB-C / Thunderbolt 3 или через обычный порт USB 2 или 3 с помощью адаптера. Он не будет работать с портом Thunderbolt 2.

Потребуется ли дополнительный источник питания для использования Zen Go Synergy Core?

Нет, так как Zen Go Synergy Core питается от шины и вы можете подключить его напрямую к компьютеру без дополнительного источника питания. Вы можете использовать его как автономное устройство, используя дополнительный порт – используется только для питания

Какую технологию синхронизации использует Zen Go Synergy Core?

Zen Go Synergy Core использует 64-битную технологию Acoustically Focused Clocking ™, разработанную компанией Antelope Audio и используемую в большинстве наших продуктов.

Имеет ли Zen Go Synergy Core такое же качество предусилителя, как и более дорогие интерфейсы Antelope Audio?

В Zen Go Synergy Core используются дискретные, ультралинейные предуселители консольного уровня, которые используются в устройствах высокого класса, таких как Zen Tour и Orion Studio Synergy Core.

Сколько эффектов имеет Zen Go Synergy Core?

Он поставляется с 37 эффектами Synergy Core и вы можете расширить библиотеку эффектов в Магазине программного обеспечения, добавив доступные в настоящее время эффекты Antelope Audio.

Можно ли посылать разные сигналы на выходы RCA и Monitor?

Нет, выходы RCA и Monitor являются зеркальными и используют один и тот же сигнал, но вы можете подключить одновременно две пары динамиков.

Close Menu

© 2016 Antelope Audio. All Rights Reserved